I didn't write up a installation procedure and unfortunately did not take any video as I did the installation in a span of a week due to the weather. Using the youtube videos I posted earlier as well as general knowledge I did the following;
1. Remove the radio. Take off the back piece. It just pops off with a pry tool or a small flat head screw driver. Remove the 4 top bolts holding the radio in place. Pull the radio out. Disconnect every wire harness attached to the radio. You have to press the tabs to take them out.
2. Once you do that and the radio is out of the van, you have to remove the screws that is attached to the black plastic housing holding the radio to the touch screen. As
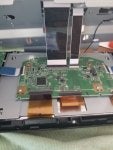
oasis6164 noted, take your time on this one. You might want to first take a pic of the screws so you know where to put them back when you put back together the radio. Once you remove the screws, you should be able to remove the black plastic housing from the radio. Then remove the additional screws holding the touch screen from the back portion of the radio. Once you do this the touch screen should be loose enough to seperate.
View attachment 67230
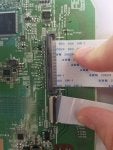
3. Gently seperate the touch screen from the rest of the radio. Follow the instructions on the guide and remove the long black short ribbon (the right one) from the touch screen. You have to press down to loose the clip. The other big white ribbon (left) should remain in place and attached to the radio and touchscreen. Take that short black ribbon per the pictures and attach it to the 360 bigger board (there are 2 boards, a big one and a small one) . Make sure you press back up the tab and check to make sure the connection is secure. Take the white short ribbon that is attached to 360 bigger board and attach it to the touch screen board where you removed the black short ribbon. Make sure you check the connection. Per the picture you can then place a piece of electrical tape and attach the bigger board ribbon to the metal base of the radio. After this you can start putting back the radio together by attaching the touch screen back to the radio with the screws and last the black plastic housing with the screws. There is going to be the short black ribbon with the yellow tape on the little board will be hanging outside of the radio. You can see it on my picture. You should remove the yellow tape and wrap it with electrical tape and tape it to the bottom of the radio.
View attachment 67233
View attachment 67235
View attachment 67236
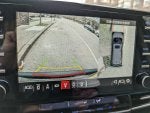
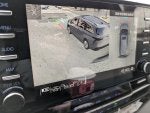
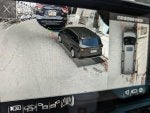
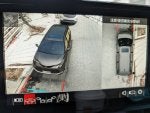
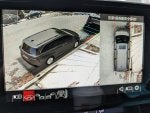
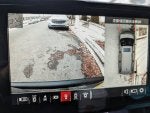
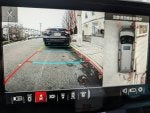
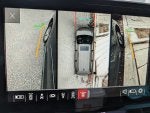
4. Attach the wire harnesses in the Van to the 360, and attach the 360 to the radio remaining harnesses. The one you just installed in the radio should be attached to the 360. There is one harnness that controls the SRS airbag sensor will need to be re-attached to the radio. It is located on the left hand side in the back of the touch screen. Once you attach everything, attach just the camera only to the 360. Black is Front, Yellow is Back, Red is left and Blue is Right. Turn car and radio on. and test to make sure it is working. You will have to go into reverse to activate 360 if it does not activate itself on its own. You can also use the remote if you pull the IR out. The kit did not come with the battery for the remote so you have to order it seperately. Its CR2025.
https://www.amazon.com/dp/B071CTWW5Z?psc=1&ref=ppx_yo2ov_dt_b_product_details If it does come on and the cameras do work, then you are done with this part, and you can detach the cameras from the 360. Leave the radio attached to the wire harnesses and not put back in its place in the van. As an option, you may also attach usb memory stick to the 360 for recording purposes. I attached a 128 gig one and had to format it in the unit.
While the radio is still out as
oasis6164 noted you have to cut a wire on the 360 harness, see the picture below he posted earlier so the 360 will engage when you put the car in reverse, else you will see a blank screen.
View attachment 67242
View attachment 67231
View attachment 67232
5.
Open the trunk and using the video above to take off the panel. My van has JBL premium speakers so I had to remove 4 bolts that was holding the speaker housing, and remove the wire harness. Then I was able to access the rear camera housing. Removed the 2 screws holding it in place and detached the wire harness. The wire harness will no longer be used so you can zip tie it to other wires if you like. Attached the 360 rear camera to the same spot you removed the old one. Attach the yellow long wire to the rear camera. You have to run it through the ceiling to the front of the van (either side). The high brake light panel can pe popped off. I ran mine through the left side as I previously ran my digital rear view mirror on the left side as well (see picture) . You should be able to stuff the wire in the ceiling etc by making an opening small enough with your fingers. The ceiling etc does give way to make this happen. Once you ran it to the front you can stop running it once you reach the front driver side door or front passenger side door (see pic below). Put back the JBL speaker with the 4 bolts and put back the trunk Door Panel. Make sure you have enough slack so when the trunk open and close it does not pull the camera wires apart.
View attachment 67247
View attachment 67248
6.
Using the Start X video, you need to open the paneling on both sides so you can run the wires to the radio. Once you did this then you can fish the rear wire to the radio. To do that you will need a wire tool. I used this one for all of the fishing. You can use that or something similar.
https://www.amazon.com/dp/B07PGPGT2P?ref=ppx_yo2ov_dt_b_product_details&th=1 . Set the wire fish up and stick it through the hole from the radio to the side where you ran the wire to. You should make it long enough so you can see it once you fished it down. Then attach the rear wire to the fish and gently pull it back up then connect it to the 360 Red wire. As
oasis6164 noted, you will need an extension or 2 to make sure the wire reaches the radio. I didn't need the extension for the other wires just for the rear one. Leave the paneling and the radio open until you have ran all of the wires.
* To be continued *