
Has anyone tried this option for the sienna? Or is the plug even there? Our van hasn't arrived yet so can't confirm if we even have the same plug. Awesome if we did

Young James
Dash cam
Young James
Discussion starter
98 posts
·
Joined 2020
- Add to quote Only show this user
Has anyone tried this option for the sienna? Or is the plug even there? Our van hasn't arrived yet so can't confirm if we even have the same plug. Awesome if we did
40 posts
·
Joined 2021
That’s awesome. The product description on Amazon says it’s compatible with 2016-2020 Sienna. I gotta check out that plug when I get the chance.
Young James
Discussion starter
98 posts
·
Joined 2020
Yup, doesn't get any easier than that. And that's what I'm thinking. Works for 20 sienna, so doubt the mirror has changed much between the 2 models
196 posts
·
Joined 2020
Wow!
I saw Toyota dashcam on page 13 of the 2021 Sienna ebrochure (LINK) https://www.toyota.com/content/ebrochure/2021/sienna_ebrochure.pdf
Our Sienna is on order and when I called my dealer to add this, they said they could not add it. No reason given.
Not sure if it is because I already ordered, or if the Toyota version is not yet available.
Thank OP for posting, this looks so simple! I hope the 2021 has the same mirror plug.
Young James
Discussion starter
98 posts
·
Joined 2020
We can add the Toyota Dash cam to our seinna here in Canada, but it's not cheap at $500 bucks. I like the fact that it's hardwired in and installed professionally, but not worth that money. The plug on the mirror would've be a game changer. My brother has been using this method in his tundra for a while with zero issues. Very unfortunate it appears we can't do it that easy. Knew it was too good to be true haha
33 posts
·
Joined 2021
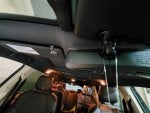
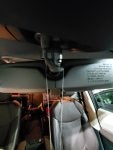
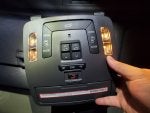
Doesn't look as easy as that tacoma. Best pictures I could get of the back of the mirror. There is no easily accessible 12pin connector to be seen
Attachments
-
 4.7 MB Views: 1,124
 -
 1.9 MB Views: 996
 -
 1.1 MB Views: 1,057
196 posts
·
Joined 2020
What a pissah!
@Stingray250 - I doubt it matters, but do you have the Digital rearview mirror with Homelink ?
@Stingray250 - I doubt it matters, but do you have the Digital rearview mirror with Homelink ?
158 posts
·
Joined 2020
@Young James unfortunately the '21 Sienna Digital Rearview Mirror with Homelink is the same as @Stingray250 's Tacoma
![Image]()
330 posts
·
Joined 2021
I was just thinking the other day that it'd be awesome to have a USB port in the back of the rearview mirror. With good dashcams out there for <$100 and the technology changing all the time, being able to easily swap them out (vs a factory installed one at 5x the price) would be nice.
36 posts
·
Joined 2013
I bought a Street Guardian a couple of years ago for less than $150.00. I haven't had a problem. I think it works pretty good and service techs don't notice it. I took the van in for some potential A.C. work and when I got the van back I watched the video to what they did. They didn't do any thing they said they did. The proof was in the pudding. Needless to say it was only an estimate on work to be done so I didn't go back.
58 posts
·
Joined 2021
Just saw this post, and wanted to chime in. My dashcams have caught mechanics claiming they did work they never did at least 3 times. It’s usually tire rotations they lie about. Sadly for them (lol) my dashcam has live view, and I log into it to catch them…lol.
33 posts
·
Joined 2021
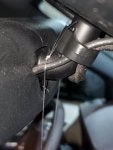
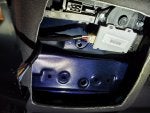
I found the 12 pin connector on the my 2021 sienna (sorry for any confusion above but I don't own a tacoma, the pictures were the sienna's home link digital rearview mirror). The 12 pin connector is behind the map light assembly and there is no easy way to snake a usb cable out the back of the rearview mirror, so you'll have a loose wire above the mirror.
Attachments
-
 4.7 MB Views: 1,115
 -
 4.9 MB Views: 1,143
33 posts
·
Joined 2021
Just saw on Toyota sienna builder, there is a new dash cam that would make wiring to the map light assembly and 12 pin connector a little bit more sightly
Attachments
-
 651.4 KB Views: 1,067
11 posts
·
Joined 2021
Here is the link to the app that goes with it. Apparently over a 100+ folks have installed the app - goes to show how much of these they are selling.

 play.google.com
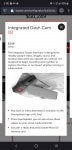
Toyota Integrated Dashcam - Apps on Google Play
The Toyota Integrated Dashcam app is a convenient way to connect to your Dashcam
Young James
Discussion starter
98 posts
·
Joined 2020
That's a neat looking camera. I like that. Much different than the option we have here. Unfortunate the plug is hidden like that. Im trying to get my dealer to include it with the van when it arrives. We'll see how it goes
11 posts
·
Joined 2021
So looks like the above part # listed is NOT compatible with the sienna. Here is Toyota integrated dash cam part # compatible with Toyota Sienna 2021: PT94908210 - Multi dcam - Genuine Part
11 posts
·
Joined 2021
I had the Toyota dashcam installed by the dealer. Apparently it was their first install in the region so I got charged the extra labor hours for their just in time training on my dime. labor was nearly as much as the dash cam was. it has no display on it so you download the app on your mobile device and connect to it. Did come with a small microsd card that I upgraded to a larger size. The camera is your typical 1080p 30 or 60 FPS recording 2 minute files. Quality is ok. Plates are somewhat difficult to read with the bright headlights reflecting off of it at night, though this is similar to other highly rated dashcams as well.
8 posts
·
Joined 2021
Following on this post as my 2021 Sienna XSE is on the way, and I am looking for a dash cam solution..
345 posts
·
Joined 2017
I think this is a very nice dashcam for the money. You see the review here. He also review the 2021 Sienna and the other dashcam from the same company.
58 posts
·
Joined 2021
The only issue with the Vantrues (now that they switched to using capacitors instead of batteries) is the FPS. FPS is what’s going to catch the license plates and other minutiae. Way more important than resolution.
452 posts
·
Joined 2018
I have a DDPAI Mini3 I transferred over from my
last car and with a ball and socket mount it sits right under the sensor so it is almost invisible from the inside and out. The other benefit of having it tucked under is it is protected from direct sunlight, doesn’t interfere with sun shade, and it acts like a shade. Don’t need shots of the sky, so it also helps the exposure since the camera doesn’t have to expose for the bright sky and dark asphalt.
last car and with a ball and socket mount it sits right under the sensor so it is almost invisible from the inside and out. The other benefit of having it tucked under is it is protected from direct sunlight, doesn’t interfere with sun shade, and it acts like a shade. Don’t need shots of the sky, so it also helps the exposure since the camera doesn’t have to expose for the bright sky and dark asphalt.
7 posts
·
Joined 2021
Can you please upload a pic? How are you powering it? Through the mirror wire harness or did you run a cord to your fuse box?
If anyone else has any installed an OEM or after market cam, tips and pics would be greatly appreciated!
If anyone else has any installed an OEM or after market cam, tips and pics would be greatly appreciated!
100 posts
·
Joined 2020
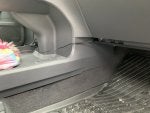
I'm trying to figure out if I want to hard wire it in the fuse box, plug it in via an adapter in the overhead light section or leave as is. I currently have it plugged into the outlet under the centre counsel but I don't like seeing the wires. It was pretty easy to hide the cable except for the last 6" or so at the bottom. I also don't like the fact that the plug gets hit when you throw something in the bottom storage area.
Attachments
-
 3.8 MB Views: 640
 -
 1.8 MB Views: 728
2,076 posts
·
Joined 2021
Nice. I need to do this too.
FWIW, 12V splitter (or just an extension) like one below might be a little bit more sturdy than the smaller plug. Only reason I know about splitter is because I had to use it in my old car with only one 12V outlet. I wish there was at lest one more 12V somewhere else. I know there are plenty of USB outlets so it is OK as is. Our other small car has total 3. One of them is in the Glovebox that I have used for the dashcam.
BTW, TIL that the rubber mat under the bridge comes out like floor mats. If you still have enough slack, you can run that last 6 inches under it and then along the edge going up.
Also, USB A 90 degree Right Angle adopters may help reduce the stick out. Looks like they are selling them in pairs since USB A is not reversible, and many people may have been returning them when they see that one they got goes in the wrong direction") . However, for rotating plug like 12v, it makes no difference unless your adopter has 2 USB A outputs.
. However, for rotating plug like 12v, it makes no difference unless your adopter has 2 USB A outputs.
FWIW, 12V splitter (or just an extension) like one below might be a little bit more sturdy than the smaller plug. Only reason I know about splitter is because I had to use it in my old car with only one 12V outlet. I wish there was at lest one more 12V somewhere else. I know there are plenty of USB outlets so it is OK as is. Our other small car has total 3. One of them is in the Glovebox that I have used for the dashcam.
Amazon.com: [Upgraded Version] Electop 1 to 2 Car Cigarette Lighter Splitter Adapter Power Charger Port, 12V 24V Plug Socket 2-Way Splitter Y Adapter, 10 inch Cigarette Lighter Extension Cord 16AWG with 15A Fuse
Buy [Upgraded Version] Electop 1 to 2 Car Cigarette Lighter Splitter Adapter Power Charger Port, 12V 24V Plug Socket 2-Way Splitter Y Adapter, 10 inch Cigarette Lighter Extension Cord 16AWG with 15A Fuse: Cigarette Lighters & Parts - Amazon.com ✓ FREE DELIVERY possible on eligible purchases
www.amazon.com
BTW, TIL that the rubber mat under the bridge comes out like floor mats. If you still have enough slack, you can run that last 6 inches under it and then along the edge going up.
Also, USB A 90 degree Right Angle adopters may help reduce the stick out. Looks like they are selling them in pairs since USB A is not reversible, and many people may have been returning them when they see that one they got goes in the wrong direction
. However, for rotating plug like 12v, it makes no difference unless your adopter has 2 USB A outputs.
243 posts
·
Joined 2021
Genuine Toyota Integrated Dash Cam - Edited!
I received my Toyota Integrated Dash Cam that is depicted in the 2021 Sienna brochure - the Toyota Part # for the Cam: PT949-08210 the wiring harness IS NOT required for Sienna! I am not promoting this particular Cam, as has been discussed in this thread there are other Cams that are perhaps a better value with enhanced features/performance. But I wanted to get this info out there in case it might help others who are interested. I have not installed it yet, but have reviewed the installation instructions and it is easily within the means of a DIY installer to do in under 1 hour. IMHO a dealer should offer to install it for the cost of the cam - if part of a new vehicle sale. My dealer didn't even offer to sell it to me so I ordered it online.
Install / Consideration Points:
The wiring harness is plug n'play with factory supplied connectors (no cutting, splicing, etc.), the cam itself does NOT operate off a standard mini/micro USB interface - hence the wiring harness is required. Was hoping the harness might have a USB interface - and could be used stand-alone for others to install a non-Toyota Cam.The wiring harness is robust, tape wrapped and double fused - of very high quality. PS: it uses 10 pin connectors NOT 12 pin that has been discussed earlier in this thread with respect to a Tacoma install.The Cam and Harness shares a fitment with Venza, but the harness is NOT REQUIRED for Sienna.- The Cam connector plugs directly into the blue connector indicated in the attached instructions. Which means there is likely an appropriate power source in the connector to wire in a USB adapter for those wanting to tap this for a non-Toyota cam - I don't have my Sienna to test with a volt meter to see what is there.
- The install requires no specialized tools or wiring runs other than bundling the excess harness lengths, zip-tying them, and placing inside the headliner near map light and door switch console - pics in Stingray250's post #15.
- The Cam housing itself is very well designed has a distinctive quality feel and heft, it has some built-in ventilation slots, and well marked buttons - it looks like a factory device.
- The box the Cam comes in has a label affixed that says: "ATTENTION - the installation instructions for this accessory are on the electronic Toyota Information System (TIS). Please see your dealer for a copy." When requesting the copy indicate your installation is for a 2021 Sienna. It is an e-mailable PDF document with pictures.
- The instructions do specify disconnecting the 12V battery prior to installing - not sure if this step is a "just in case", or if this effects a re-boot/initialization to setup communication with the Sienna and Cam, but I'll follow that part as it's easy to do and a reasonable precaution.
- I have attached the install instructions PDF for reference to those interested.
- Anyone have a need for a PT949-48210 wiring harness kit for a Venza install - LOL.
Attachments
-
2.3 MB Views: 902
204 posts
·
Joined 2021
Seeing @BearInStPete's guide on installing the OEM cam, I may end up getting it just for the look and clean install even for the hefty price and probably not that much better compared to the rest.
395 posts
·
Joined 2021
@BearInStPete did you just order the camera from your dealer or somewhere else?
243 posts
·
Joined 2021
I ordered it from a dealer in Chicago, it seems that many dealers participate in an online store that offers discounts off MSRP for parts & accessories that can range from 0-15% off and various forms of reduced cost shipping for certain size orders. The cam has an MSRP of $299, but you should be able to find it in the 10-15% off plus free shipping price point. Most of these same dealers say that the pricing is "on-line" only. Just be careful that many of the sites will suggest the Venza wiring harness is required because the public facing parts fitment system is not up to speed with 21 Sienna, and the cam was first promoted for the Venza.
I did this, because all the sites indicated the wiring harness was necessary, and the Dealer in Chicago caption it as for Venza and Sienna, bundled with the wiring harness because it was required. So when I got the cam, and requested the install guide - it was for a Venza. I wrote my original post thinking the Sienna install was going to be similar (requiring the wiring harness), but called the dealer back and asked if there was instructions for the Sienna. Then I got them by email and carefully read them - NO wiring harness required as it was a direct plug in the the blue connecter there for that purpose! So I did the strike-through edit on my post so that those who saw the original would figure it out.
So at the end of the day, an OK cam, that looks like a factory items, with a simple plug n'play install for mid $200s I thought was a good value. But those with your Siennas can put a volt meter on the leads of the blue connector and I suspect that this is at least an always hot 12V, ignition switched 12V and a ground in that connector - an easy wire-up for any aftermarket cam - but will require some cutting and splicing of wires.
204 posts
·
Joined 2021
@BearInStPete - can you tell me how many pins for the blue male connector (not-in-used connector tucked under the overhead console) used to connect the OEM dash cam? Someone earlier on mentioned 12 pins, but that doesn't look like one based on the size. Might be wrong, but would be great to get a confirmation.
243 posts
·
Joined 2021
I don't have my Sienna yet, from the cam side the connector is 5 pin female only 3 wired - see 2nd pic below. My strong educated guess, based upon features present in the OM for the Cam, one lead is ground, one is always on 12V, one is ignition switched 12V - 12V verified by operating voltage from label on back of cam. BUT I don't have a means to verify this without my Sienna. The actual blue connector in the van may have more leads actually wired. If you have a voltmeter and your Sienna test it and post your results.
PS - definitely not 12 pin, that was started by someone referencing an install on a Tacoma connecting to the rear view mirror connector using a third party adaptor - good intentions but incorrect noise in the thread.


,
PS - definitely not 12 pin, that was started by someone referencing an install on a Tacoma connecting to the rear view mirror connector using a third party adaptor - good intentions but incorrect noise in the thread.
50 posts
·
Joined 2021
I bought the dash cam from the dealer parts department today. Was about $250. Installed it myself in about 10 minutes. Pull down the overhead console (with the map lights and door/moonroof switches) route the cable under the headliner and plug it into the connector that is sitting right there. Super simple. The instructions said to remove the casing from around the mirror but I can't figure out why! They were also for a Venza but even so it doesn't seem there was any reason.
edit: Yes the part number is PT949-08210 and yes they might tell you it is for a Venza. It is the correct part for the 21 Sienna and works perfectly!


edit: Yes the part number is PT949-08210 and yes they might tell you it is for a Venza. It is the correct part for the 21 Sienna and works perfectly!
50 posts
·
Joined 2021
Sorry, I didn't take a picture with the console down. But it was the only unused connector up there and it fit right in
Sent from my SM-G996U using Tapatalk
Sent from my SM-G996U using Tapatalk
149 posts
·
Joined 2021
Do they have any after market adapters for this yet for power through the mirror area using other dash cams, or only OEM option for this?
50 posts
·
Joined 2021
I assume you could snip the conmector off and use the +/- leads to power anything you wanted. just use a multimeter to check the voltage.
Sent from my SM-G996U using Tapatalk
Sent from my SM-G996U using Tapatalk
196 posts
·
Joined 2020
@gwbennett - Fantastic - thanks for giving us all the confidence.
After you have used this around town, in day/night, can you update us on the quality?
After you have used this around town, in day/night, can you update us on the quality?
4 posts
·
Joined 2021
Did anyone disconnect the battery, when installing the dashcam? I wanted to avoid doing it.
-
?
-
?
-
?
-
?
-
?
-
?
-
?
-
?
-
?
-
?
-
?
-
?
-
?
-
?
-
?
-
?
-
?
-
?
-
?
-
?
- posts
- 298K
- members
- 107K
- Since
- 2009
SiennaChat is the forum community to discuss problems, maintenance, repairs, mods, projects, specs and all things Toyota Sienna.


