Toyota Sienna Forum - siennachat.com banner

Traveller ('23 Platinum AWD) - Family Hauler/Roadtrip Build

2 reading
170K views 434 replies 45 participants last post by  yonah  
#1 · (Edited)
Current photos of our Sienna :cool::
Image
Image

Image

Image

Image
Image
Image


---

Jump to modification list:

---

Greetings,

Starting up a modification thread to track and share my tinkering, thoughts, and family adventures with our new kid hauler, road trip vehicle - a 2023 Sienna AWD Platinum.

Background. I’m a big Toyota fan and have owned several Toyota 4x4s over the years; most notably a heavily modified Tacoma and a couple Land Cruisers.

Photos from some adventures with the Tacoma:
Image
Image


The 4x4s were all superb, capable vehicles, but with a growing family and shifted priorities we required an AWD vehicle that is convenient/practical for day-to-day activities with kids. Outstanding fuel economy and range, for long stretches of pavement, would also be a welcome change.

Given this, the new Sienna was the natural choice.

Finding one in this market was a challenge to say the least, but we were able to secure an allocated unit this past December and took delivery in January.

Fresh off the transporter:
Image


A one way flight to Tennessee, followed by a couple days driving, and it was in the garage.

—-

My plan with the modifications to this van is to keep the vehicle’s aesthetics and operability/reliability/drivability as OEM as possible, while adding to the functionality and convenience of the vehicle. Again, this Sienna will be our daily driver/kid mover, so subtle, functional upgrades are the endstate - this isn’t going to resemble a SEMA or tradeshow vehicle, but rather my swing at improving upon an already incredible platform and making it the ultimate vehicle for the “Great American Roadtrip“. I look forward to exploring this country with my family and using this van to do it.

I hope this thread helps and maybe even inspires other Sienna owners to expand the capability of their vehicles; I look forward to gaining knowledge from others here on the forum and sharing my progress along the way.

Thanks for stopping by. Cheers,
 
#93 · (Edited)
Packasport Voyager (System 90 XP) - Rooftop Cargo Carrier restoration and install (Part #3)

From here, the work was done. Restoration complete and we now have 16 cubic feet of additional storage.

It’s neat to have a 22-year-old box on a four-month-old vehicle. It looks great on the Sienna - white-on-white - and the styling of the box is classic, so it fits the Sienna’s modern lines very well. Hopefully, it lasts us many years and can be an heirloom item that can be passed down to one of the kids.

I had a lot of fun refurbishing this box. I think all in, I have about $550 in the box plus new parts and decals - so about 1/4-1/5 what it would cost new with shipping; and about 1/2 the price of a new Thule or Yakima unit. It’s so well-made. The boat-like construction is easy to clean and freshen up with common marine cleaning products / polishes. And the readily available over-the-counter parts and hardware make a resto job like this doable by a shade tree mechanic like myself. It’s also cool to see Packasport still producing these high-quality cargo boxes.

Photos of the Packasport Voyager mounted on the van:
Image
Image
Image
Image
Image
Image
Image
Image
Image
Image


*one thing you may note in the above photos is that I removed the OEM roof rack crossbars. The OEM crossbars are not adjustable and fixed to the roof rails. Unfortunately, they are about 1” too close together when it comes to mounting a Packasport box; which needs a roughly 30” spread between bars - as the recessed crossbar mounting channels are of course fixed on the bottom of the Packasport’s hull. I picked up a generic set of black, adjustable clamping crossbars from Amazon. They allowed me to meet the 30” spread and mount this box. Eventually, I’d like to find a set of bars that mount lower to the roof, but these work for now and they sit a little lower than the OEM crossbars, so it’s bearable.

I later devised a simple vertical storage rack to mount the Packasport to the wall in my garage; info here: Traveler - The Family Hauler/Roadtrip Van

---

EDIT - I removed the crossbars depicted in the above photos and replaced them with the sleeker, and more low-profile, Whispbar S45W crossbars. Photos here: Photos of the Packasport Voyager roof cargo box mounted to the Whispbar S45W crossbars
 
#94 · (Edited)
A couple of weeks ago, the van hit the 5,000-mile mark at about four months of age.
Image


I took it to the dealer for the 5k tire rotation and multipoint inspection. I also had them change the oil; as I like to do 5k oil changes, despite what Toyota recommends at 10k. Oil isn’t that costly, so it’s cheap insurance.

I also asked the mechanic to give the van a thorough pre-road trip inspection while it was on the lift as we will be traveling across the continental United States mid-May for a cross country move to the West Coast (from Virginia - literally coast-to-coast). I’m really looking forward to seeing the country with my family and taking some time to relax.

It will also be fun to gather some vehicle data (weight, load configuration, MPGs) from the trip and post it here for posterity. This move was also the reason for the blitz of upgrades to the van over the past few months. My goal was to modify the van ahead of this move - and with more than a few late nights in the garage - it happened.

Some walk-around photos are below of the Sienna as it sits now. I’d say at this point, it’s modified to about 75% of where I want it to be. There are a few more things I’d like to do (and will probably thing of some more in the coming years...), but for now, it’s ready to roll westbound :cool:🤙
Image
Image
Image
Image
Image
Image
Image
 
#97 ·
Looks nice, but I have a few questions, if you don't mind.

1. The pod appears to be hinged at the front and opens from the rear. It also appears to be placed rather far back on the roof. How do you load it? At 6' 5", I'm not exactly 'short', and I have trouble seeing the top of my van, let alone trying to look into a box placed on top. Your pod is beyond reach from the sliding door's step and out of reach from the rear bumper.

2. How often do you plan on using the pod? Is this a daily-use item or will you be installing it and removing it when needed, possibly a few times a year? It just seems (to me) to be a bit awkward for daily use, and the MPG penalty for constant use might not be worth it. Then there is the inconvenience of installation/removal. A few times a year might be tolerable, though.

3. Hopefully you get a chance to determine the MPG penalty before you get everything loaded up for your trip. I see pods on vans quite often around here, have always wondered what the MPG penalty was.

For your trip, I can see how useful it can be. One picture shows what appears to be a stroller. Having other 'stuff' for a small kid renders other space in the van useless, as nothing stacks, yet everything needs to be accessible.

Good luck with your trip. I left California over 40 years ago, I can't imagine any reason that is compelling enough to make anyone move there voluntarily.

.
 
#98 ·
Thank you for taking the time to shoot me a few questions. I’ll try to answer them below:

1) Yes, it’s hinged at the front, so the box must be loaded from the back rear half, either from the back corners or back of the box.

With a roof box you generally want to mount it as far back as possible on the vehicle. I believe Packasport even mentions this in their installation literature. The box creates the least amount of drag in this position. For the 4th Gen Sienna, the limiting factors are the end of the OEM roof rails (the crossbars can only slide so far back on these rails) and the rear spoiler on the liftgate (which can contact the box when the liftgate is up). I didn’t snap a photo, but when the liftgate is up (which I have set to the highest opening position), there is about 1/2”-3/4” between the top of the spoiler and the back of the box.

As for loading, even at your stature it would still be difficult to load the box flat footed. I stand on top of the rear tire and hold the OEM roof rail with my non-dominant hand and load the box with the other. My wife generally hands me each item one at a time and I load from there. However, with some dexterity and balance, while standing on the tire I can lean against the side of the van and use both hands to position items inside the box to maximize storage space.

2) My use case is a mounted cargo box 2-3 times per year at maybe 2-3 weeks in duration each time. Install and removal is not that bad. I can prep it for install/removal myself, but lifting it on and off the vehicle is a two person job. It’s not that the box is that heavy (around 50 pounds, IIRC), it’s just big and awkward to hold (it’s also really smooth and slick to the touch). I’ve seen YouTube videos where guys have fabricated hoist systems in their garages for roof boxes, rooftop tents, camper shells/toppers, etc., but that is a lot of work, IMO, to solve a problem that literally takes two people 15 seconds from start to finish. And you would still need a 7.5’-8’ garage door to clear the top of the roof box. The only real advantage I see with these hoist systems is they store the box up and out of the way - it definitely saves floor space in the garage.

3) I did a shake down run with the box mounted on the van for about two weeks before our trip. I did this to ensure that everything was mounted correctly (new cross bars and box) and that there were no issues that would arise while on the road. So far, so good.

As for fuel efficiency, during the two weeks of shakedown, I noticed no noticeable hit to fuel efficiency with a mixture of city and highway driving (under about 65 mph). This surprised me a lot. During that two week period, I knocked out a four hour round trip to a nearby city and got 36 MPG with the box mounted.

However, so far I’m seeing around a 3-4 MPG reduction at 65+ mpg while driving across the country. Though, I’m not sure how much of this is due to other factors such as the increased weight of the vehicle (from luggage and supplies), cross winds, and the steady gain in elevation over the past day as we climbed the Continental Divide.


—-

Yes, a roof cargo box is very useful, especially with kids. We keep the stroller, extra clothes, diapers, general supplies, and dry goods up there - mostly lighter weight stuff that’s only accessed once per day, if that. But yes, like you mentioned, these are all things that are not easily stowed inside a vehicle, so the box is helpful in solving that problem.

As for CA, it’s a move due to an educational opportunity that I couldn’t pass up and will be relatively temporary, but the change in scenery will be welcome. However, I can certainly understand your statement.

Let me know if you have any more questions. I appreciate the interaction a lot. If you’re serious about picking up a roof box, my recommendation would be to buy secondhand for the cost savings.
 
#99 ·
I received a new Scan Gauge 2 today with the new version 4.54E8. Yes, it was a brand new device, no strings attached. They didn’t even ask me to return the old one. Cable and manual not included, I’m reusing the old cable and I already have the manual from the upgrade.

I was excited to take it for a spin and by golly it works. For Sleep Event, 0 RPM and COM both work, just not VOLT. @yonah, which did you set it to?

Image
 
#102 ·
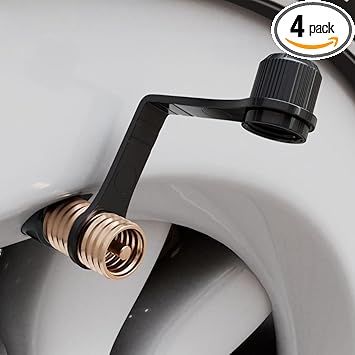
I thought the No loss stem caps are a good idea. However, the one’s you recommended are now $14.95 for 5, $3/ea.

I found these on Amazon, 4 for $8.99, $2.25 ea. and bought 2 packs.
 
#106 ·
I thought the No loss stem caps are a good idea. However, the one’s you recommended are now $14.95 for 5, $3/ea.

I found these on Amazon, 4 for $8.99, $2.25 ea. and bought 2 packs.
Make sure they’re plastic and not metal (like aluminum or brass). IIRC, the aluminum Toyota valve stem threads will seize to aluminum or brass valve stem caps.
 
#108 ·
@kolkh, my exact experience. The portable jumper is invaluable, and was first used on the Sienna. I’ve had the jumper for nearly 3 years never used, just maintenance charging all this time until now.

Additionally, turn on vehicle in Accessory mode, it automatically shuts down 20 min. I wanted to continue listening to the radio, turned it on a 2nd time. Battery drained. Needed to jump again.

Hybrids!
 
#109 ·
What type of portable jumper are you referring to? I might need to have one of these ready at all time since my Adapt Solutions Links seat functions probably depends completely on that small battery.
 
#112 ·
I have this one. It is a way overkill for a hybrid, but I have alternate uses for it as a power pack.

 
#110 · (Edited)
@Sienna25AE
as an example:

It is over-sized for 2023 Sienna, but I bought it for "just in case" 2006 Sienna. ...and never used it to start a 18 year old van! It has passed its dependability test: jump started a generator during power outages.
 
#114 · (Edited)
I bought this one several years pre-Sienna, went unused. Charged every 3 months.

Only began using it on the Sienna last several months, 3 times. It’s invaluable.

View attachment 63089 View attachment 63090


Please checkout above. There is a right way and "Fried ECM and lots of $$$" way to jump start the Sienna.
 
#113 ·
Thank you all for the recommendations. I will look into it to get one of these for sure because life depends on it when I am stranded with my mom
On the line. If it’s was by myself, worst case scenario is I lock up the van and walk home.


Sent from my iPhone using Tapatalk
 
#116 · (Edited)
#117 ·
I think I found something...


Amazon.com
Solution 1: If you want -by any means !- to connect cables in the engine compartment, why not to use a set of long old jump start cables, which everyone was carting out 'just in case' in non-hybrids, as an extension to a negative terminal cable. The 'jump start' of a hybrid is not a jump, per say, the current to recharge 12V battery will be a few amps from a smart Li-on unit and not ~100-300Amps, thus, a requirement "do not use extension cord" does not apply ...
Solution 2: For the same reason (i.e. you are not jump starting a big ICE -- merely powering a computer), a connection directly to or around 12V battery, has no potential to cause a hydrogen explosion. If you connect your Li-on unit to 12v battery, proper ventilation is guarantied via opened tailgate and a regular hose from the battery to outside of the vehicle. What is the problem?
 
  • Helpful
Reactions: Sienna.Guy
#118 ·
A fried ECU was the problem. OP of that thread didn’t indicate whether it was a vehicle-to-vehicle jump. I believe I saw a YT video saying if vehicle-to-vehicle jump, must be hybrid-to-hybrid. Otherwise over current may have been introduced by the non-hy vehicle.

Additionally, I recall the proper set-up for the from vehicle is turned off. Most people turn it on and even gas it.

Image
 
#124 · (Edited)
Cross Country Road Trip

Northern VA -> CA Central Coast
~3,600 miles
Avg. MPG: 31.4
Image


States visited:
-VA
-NC
-TN
-KY
-IL
-MO
-KS
-CO
-WY
-ID
-NV
-CA

—-

We recently completed a move from the East to West Coast. As a follow-up to that post, I’d like to share some thoughts and info from the cross country drive in our ‘23 Sienna.

As a forward, I’ll say that the 4th Gen Toyota Sienna is, in my opinion, the best road trip vehicle on the market. The Platinum trim is on par with, if not a little better than, my previously-owned Land Cruiser 200-series in highway driver comfort. The Sienna’s outstanding driving range (500+ miles) makes it easy to leapfrog from destination to destination with ease; my Land Cruiser or Tacoma were great cars, but thirsty - both of those vehicles would need to be refueled every 340’ish miles, or so. As an example of our Sienna’s range, we were able to drive - over the course of one day - from Boise, ID to South Lake Tahoe, CA on one tank of fuel. Having that kind of range offers a lot of peace-of-mind when traveling long stretches of pavement - especially in the western US where services can be 70-100 miles apart.

Distance traversed:
My trip odometer was accidentally reset about halfway through the drive after a fuel up (so I do not have an exact distance for the entire drive), but the approximate ground covered was just over 3,600 miles in a little over one week, with in-and-around mileage factored in at each stop. We really hammered through the first two days to make it to the Rocky Mountains as quickly as possible.

In terms of elevation traversed, we started at sea level, then crossed the Appalachian Mountains, Rocky Mountains, then to the Grand Teton range north of Jackson, WY. We then crossed the high deserts in Southern Idaho to Boise, before heading south to Nevada and the Sierra Nevada range by way of Lake Tahoe, then terminating in central California at sea level. A lot of time was spent around 4k-6k elevation, with the highest elevation just over 8k, IIRC. Ambient temps were normal for this time of year, I think we got into the low 90s while traveling across Nevada. I used the ScanGauge to monitor the water temperature and hit 201*F once, but otherwise stayed in the upper 180s*F, pretty good.

Weight:
All of this was done with a vehicle that clocked in around 5,400 pounds - this was loaded with car seats, family luggage, food, fridge, and a packed rooftop cargo box; this number is sans passengers, so I’d guess the actual travel weight was pushing close to 5,800 pounds.

Tire pressure:
Tires were inflated to front 36 psi and rear 37 psi (cold numbers at sea level). I deflated and inflated them several times throughout the trip to keep them below 40 psi hot - the onboard compressor and Linx pressure control system made this a 5 min task, at most. The added tire pressure was implemented to account for the additional payload weight.

Fuel economy:
All said, we averaged around 31.4 MPG and I never drove faster than 80 MPH; I actually tried to keep the speed below 75 MPH and close to 70 MPH. The fuel economy of the 4th Gen Sienna is phenomenal, especially when one considers how big and heavy ours was during this trip. We also had the roof cargo box (Packasport Voyager) mounted, which certainly impacted the vehicle’s aerodynamics; I could really feel it catching the cross/headwinds at times as the winds pulled the vehicle from side-to-side.

Malfunctions:
The only vehicle malfunction, if you want to call it that, was the windshield. At about 7k miles, the van’s windshield caught a stray rock from a speeding dually truck pulling an empty flatbed trailer while we were traversing I-80 in southern Wyoming. The rock strike created an instant quarter-sized star fracture on the left side of the windshield that splintered into a 7-8” horizontal crack before I could even exit the highway. I immediately filed an insurance claim and the new OEM windshield glass was installed a couple of weeks ago here in California.

I started a thread here to pulse the community regarding the 4th Gen windshield replacement procedures and lane keep assist / collision prevention system recalibration, sharing here:
Who’s replaced their 4th Gen Sienna’s windshield?..

The Toyota dealer recommended auto glass shop that replaced the windscreen was able to also recalibrate the aforementioned driver assist and safety systems without issue. It was a one day job.

A day or so after the rock strike - RIP windshield:
Image


I also had some intermittent lost Bluetooth connectivity between the ARB Linx Control Unit and the ARB fridge at the rear of the vehicle. This kept me from monitoring the fridge’s performance (temperature readout, etc.) via the Linx Control Unit (screen), but did not impact the fridge’s ability to operate - it still functioned as designed and kept our food/drinks/milk cold without issue. The intermittent Bluetooth connection was quickly remedied with a hard restart of the Linx Control Unit, so an easy fix.

—-

My post trip thoughts:

1) The Sienna’s suspension is great for four or so passengers, but really gets taxed when additional passengers/weight are added - add a full tank of fuel, car seats, loaded roof cargo box, fridge, luggage, food/water, etc… and the pounds add up fast. Our van definitely had a rearward leaning rake throughout the trip; I could certainly feel the additional weight in the rear of the vehicle and the strain that it endured while steering, accelerating, braking, and cornering - I definitely had to adjust my driving style to compensate. To remedy this, I really think rear coil helper airbags are the practical solution. The ARB Compressor and Linx Airbag Isolation kit are both already installed (hard work is done), I simply need to now install the bags and plumb the air lines. I wish I could’ve completed this before we left, but we’ll get it sorted. The added benefit of suspension helper airbags will be the ability to carry a hitch-mounted cargo carrier or bicycle rack without a rearward sag, both things I would like to do on future road trips as our family grows.

2) I’m seriously considering an aftermarket external glass protection film, like Exoshield, to reduce the likelihood of future glass damage while driving. This was my Sienna’s second rock strike to the windshield - the first happened around 2k miles, but unlike the second crack (that required a full glass replacement), the first crack was small enough to be repaired via Safelite with resin before it splintered. I’m beginning to think the 4th Gen Sienna’s windshield is overly fragile/thin when compared to some of my previously owned Toyotas. I need to price this out to assess the feasibility.

3) I’m also going to apply some UV-blocking film (maybe tint) to the sunroof and windshield. The two front door windows were tinted to 35% by the dealer at delivery. The greenhouse effect and glare from the sun was a bit much at times and really fatigued my wife and I while we drove; especially at mid day and when we continued westbound in the evenings into the setting sun.

4) The WeBoost cell signal booster and rear entertainment system (w/ a Roku) were a hit with the kids. We budgeted a couple hours a day for movies and very rarely had cell network connection issues (even in some remote stretches of Southern Wyoming and Idaho); this was thanks in large part to the WeBoost. This also gave me some solace knowing that if we encountered an emergency, we would likely have sufficient cell service to call for help.

Link to the WeBoost Drive Reach cell booster install:
Traveler - The Family Hauler/Roadtrip Van

5) The MVP of the trip was the Shark WANDVAC vacuum. It made quick work cleaning out the car seats when we stopped. I also made a point to spend no more than ten minutes each evening cleaning, tidying up, reorganizing, and resetting the van for the next day. The WANDVAC vacuum made this chore fast and easy.

Link to the Shark WANDVAC install:
Traveler - The Family Hauler/Roadtrip Van

—-

All in all, the Sienna exceeded my expectations and again, I’m really blown away by the combination of driver comfort, cargo space, and incredible fuel economy - 31+ MPG in this use case (heavily loaded, rooftop cargo carrier, with multiple high altitude crossings). The HUD, cooled/heated seats, dynamic cruise control, and lane keep assist made the drive even more enjoyable and less fatiguing. On those long stretches of blacktop, I found a sweet spot on the right side of the steering wheel where I could rest my hand (this satisfied the lane keep assist’s desire for manual steering wheel control) and the van would essentially drive itself.

Some photos from the trip:

One of the famous Colorado border crossing road signs. The weather on the front range was rainy and views of the Rocky’s were not great.
Image


Grand Teton NP, WY.
Image


Jenny Lake, Grand Teton NP, WY.
Image


Grand Teton NP, WY
Image


I spotted this American Expedition Vehicles (AEV) 2000 Jeep Wrangler Long Wheelbase 112 for sale on the side of the road in Jackson, WY. This is a piece of Jeep history. The “112” denotes the Jeep’s stretched wheelbase to 112”. I really geeked out over this Jeep. Only twelve of these 112” stretched Wranglers were ever made by AEV; however, the success of these conversions heavily influenced Jeep to produce the Unlimited Wrangler in ~2004 (I think); the Unlimited trim would later become the four door JK/JL Jeeps that we’re all familiar with now. It’s a really cool case study in the aftermarket driving the business decisions of a major automotive manufacturer.
Image


Lake Tahoe, CA
Image
Image


Carmel, CA
Image


Cheers🍻
 
#128 ·
Weight:
All of this was done with a vehicle that clocked in around 5,400 pounds - this was loaded with car seats, family luggage, food, fridge, and a packed rooftop cargo box; this number is sans passengers, so I’d guess the actual travel weight was pushing close to 5,800 pounds.

Tire pressure:
Tires were inflated to front 36 psi and rear 37 psi (cold numbers at sea level). I deflated and inflated them several times throughout the trip to keep them below 40 psi hot - the onboard compressor and Linx pressure control system made this a 5 min task, at most. The added tire pressure was implemented to account for the additional payload weight.
A question and a comment.
Q: I thought you were taking an entire family with you. Are you not large enough to cast shadows? The members of my family are not significantly larger than most others that we see around us, but the two lightest members (my wife and me) total just over 400 pounds. Add in even a couple smaller children, there would be considerably more than a 400 pound difference between passengers and no passengers.

C: Tire pressures should NOT be adjusted when hot. Why do you feel you need to lower them to 40? If anything, considering the additional weight you were carrying, you should have started at 40 cold. Don't worry about the pressure rise when they get warm, that is accounted for when they tell you what the cold pressure should be.

.
 
#127 ·
Red Aluminum Rear Hatch Switch Overlay

A very simple modification (30 second install) - added this simple switch overlay for the rear hatch button. It’s well-made and appears durable - thin aluminum construction - with its own 3M-style adhesive.
Image


To install, the button is cleaned with an alcohol swab, then the overlay simply presses onto the switch. The illuminated “hatch closing” icon on the OEM switch is still visible with the overlay installed. The overlay has this icon cut out of the material, so the illuminated portion of the OEM switch is visible after install.

The red overlay definitely catches the eye and is an improvement over the switch’s original subdued, grey color which blends into the interior; the original switch can be difficult to find - especially during the day when the illumination feature isn’t visible. I’m a big fan of making important buttons/switches a highly visible color, like red. I may do something similar with the ignition button as well.

Link to product:
Toyota Sienna 2021+ Trunk Electric Tailgate Decorative Sticker https://a.aliexpress.com/_mM1aqRW
 
#132 · (Edited)
Packasport Voyager (System 90 XP) - Rooftop Cargo Carrier garage storage rack

Those that have rooftop cargo boxes can attest that they can be difficult to store. In an effort to conserve as much floor space as possible within our two bay garage, I devised a simple method to hang the Packasport vertically on the wall.

I secured two wall-mounted, u-shaped coated storage hooks to the wall with four 3” lag screws. Then took a 3/4” (I think) x 3’ pipe and positioned it under the front u-bolts of the Packasport (just like a roof crossbar), tightened down the u-bolts, flipped the box up, and hung it on the wall. I slid a foam floor mat between the box and wall to buffer the fiberglass and prevent any scratches.
Image
Image
Image
Image


Everything seems sturdy and this gets the box up and out of the way; it conserves real estate in the garage and protects the Packasport from bumps/dings. Not a bad solution given these were all items I had laying unused around the garage. What actually got my mind working was the 3’ pipe. I almost chunked it in the trash, but after looking at it for a couple minutes, found a good use for the material.
 
#133 · (Edited)
Some of the cleanest work and documentation of mods I’ve ever seen on any forum since the creation of the internet 👍🏼

You sir are an asset to SiennaChat. Well done!

apologies if answered already, but did you get the expected runtime out of your 60A AGM, I ask because my old 47Q ARB fridge in another build would take a 100ah Lifeline deep cycle AGM below 12V SOC in 24hrs in warm weather. It was supported by 200watts of solar though so it was always running.
 
#135 ·
Thank you, I appreciate the kind words 🍻

As for the fridge, I have found that after maybe 36 hours or so it depletes the 12v starting battery to 11.8v. At that point, the Victron SmartProtect opens the circuit to preserve the battery’s remaining voltage. This has happened once since I installed all of the aftermarket electrical kit.

I may plug the fridge in this summer and let it run one weekend to see exactly how long it takes to hit 11.8v. The battery mapping software in the ARB Linx will store the historical SOC data and depict when exactly this point is reached. It would make for a good data point.

I’ve thought about adding a 100w flexible solar panel, but we really do not let the van sit long enough to take advantage of solar charging. If I lived out of this van full-time, I’d mount a flexi panel to the roof storage box and let it ride.

Tbh with your build I’m surprised there isn’t a ham radio!

I’m trying to incorporate that in my Sienna after a recent road trip, mostly for car to car comms, hitting repeaters when remote is a nice back up.

I used a 12” magnet antenna but the ergonomics are terrible with a hand held. Looking for a clean way to mount my mobile
Not a terrible idea. Can’t beat the range of a HAM. If you install a radio in your van, I’d be interested in seeing the install photos.
 
#134 ·
Tbh with your build I’m surprised there isn’t a ham radio!

I’m trying to incorporate that in my Sienna after a recent road trip, mostly for car to car comms, hitting repeaters when remote is a nice back up.

I used a 12” magnet antenna but the ergonomics are terrible with a hand held. Looking for a clean way to mount my mobile
 
#142 ·
The Firestone Coil-Rite airbags came in the mail. Now I need to find the time to install them.
A follow-up to my post regarding the Firestone Coil-Rite airbags... I've been doing a lot more research regarding the JOR lift for the 4th Gen. I think I'm going to hold off on the airbag install until I decide which lift I want, the 3" or 2". It just makes sense as the rear coils will need to be removed for both product installs; so, it will be less work (and money) to knock out the installs simultaneously. FWIW, I'm leaning towards the 2" after talking to a SAE-certified mechanic and 4th Gen Sienna owner that has installed both variants. But the 3" looks so good with the right tires... tough call, but I'm in no rush. More to follow on that front when I make a decision.

For those that may be interested, I started this thread to discuss the JOR 4th Gen lifts and share photos, feedback, etc. If you have a JOR lift installed, please consider sharing some photos and your feedback:
Journeys Offroad 4th Gen Sienna Lift Kit - master picture, resource, and discussion thread | Toyota Sienna Forum - siennachat.com

This is also a helpful Facebook group for lifted Siennas. It's not specific to the 4th Gen, but there are quite a few 4th Gen owners that have shared info/photos via the group:
Lifted AWD Toyota Sienna | Facebook
 
#137 · (Edited)
Over the past week, I did some bench testing with the ARB Linx airbag isolation kit and the Firestone airbags to make sure everything gelled together - a good idea when merging two products into one system (I’ve learned the hard way before…).

The ARB Linx, ARB 12v air compressor, and all of the accessories (air compressor pressure control and air bag isolation kit) were installed earlier this year behind the spare tire bracket.

More on that here:
Traveler - The Family Hauler/Roadtrip Van

For clarity, here’s an install photo of the ARB Linx, 12v compressor, and the airbag isolation kit solenoids I’ll be referencing in a moment.
Image
Image


The “LEFT” and “RIGHT” labels on the solenoids denote the solenoid responsible for inflating/deflating the left rear helper airbag and the right rear helper airbag, respectively. The airlines will push into these fittings and then route to the airbags inside the rear suspension coil springs.

Unfortunately, there was a snag, the supplied 1/4” outer diameter (OD) blue nylon airline from Firestone was a no go. The Linx airbag isolation kit’s output female push fittings are 6mm and the Firestone airbags inlet port is 1/4” - the 1/4” OD line is just too snug and will not fully seat/seal into the isolation kit’s solenoid 6mm fitting.

My first thought was to use the 30’ of ARB 6mm air locker airline (that I have on hand) to plumb the bags; however, the inlet ports on the air bags are a female push fitting that is vulcanized into the bag material. This fitting has coupler on the inside of it that requires at least a 4mm interior diameter (ID) airline (to fit around the coupler and seal). My ARB 6mm air line didn’t work, as it has a 3mm ID (I think).

Photos of what I’m talking about. The first photo is of the airbag coupler fitting. The second photo illustrates the ID difference between the black ARB 6mm and blue Firestone 1/4” airlines.
Image
Image


Luckily, I found this 6mm OD / 4mm ID nylon air line via Amazon (and it was Prime eligible - nice).
Image


6mm OD / 4mm ID seems to be acceptable for the 1/4” female fittings on the air bags (it fits snug and doesn’t leak). And of course the 6mm OD fits the Linx solenoid fittings perfectly. A comparison photo of the new 6mm line and the blue Firestone airline:
Image

Much better.

Photos of the bench test at the rear of the Sienna. I tested both bags up to their 35 psi maximum and both (left/right) Linx isolation solenoids. All good, no leaks or hiccups. I was really hoping to knock this out before I start disassembling the rear suspension only to find some kind of issue with incompatible parts or a leaky bag, etc. Glad I did.
Image
Image


Now I think we’re good to go; next step is to install the bags inside the coil springs and plumb the lines.
 
#138 ·
Beautiful Documentation. I am hesitant to modify any other vehicles after taking a bath on my wrangler when I parted with it, but if I were to think about moving forward, your guides are much appreciated.

Thanks for going into detail on the cross country trip. I am preparing to fly in to Connecticut to pick up my Sienna and drive back to San Diego to avoid 5-15k markups, so your notes about mileage and sun glare will definitely be on my mind. I will have sunblock and long sleeves handy!

I look forward to more updates on this build!
 
#139 ·
Beautiful Documentation. I am hesitant to modify any other vehicles after taking a bath on my wrangler when I parted with it, but if I were to think about moving forward, your guides are much appreciated.

Thanks for going into detail on the cross country trip. I am preparing to fly in to Connecticut to pick up my Sienna and drive back to San Diego to avoid 5-15k markups, so your notes about mileage and sun glare will definitely be on my mind. I will have sunblock and long sleeves handy!

I look forward to more updates on this build!
Thank you for the kind words. I appreciate it.

I understand your sentiment. I went back and forth trying to decide whether or not to upgrade this van, but eventually chose to tweak some things and add a few upgrades that make it a better fit for the family. I think what really swayed my decision is the Sienna has so much utility for our family that we’ll likely keep it for at least a decade, if not longer. At that point, it’s worth it to modify a vehicle to check as many blocks as possible.

If I were in a position to sell the van and if the new buyer didn’t want to pay a reasonable surcharge for the modifications, I could easily remove the valuable aftermarket parts in less than a day and repurpose them in another vehicle. I tried to make everything reversible for this reason.

Congrats on finding an allocated unit. Cypress is a beautiful color choice. Safe travels for your cross country drive home!