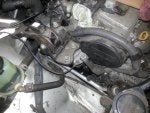
Thx for the tips! I think it is optional in my opinion for removing the wiper assemblies and crowl bracket assebly! At 120K I decide to save $650.00 labor without parts! I just have finished the complete DIY timing belt package highly recommending including (OEM cam seals, crank seal, t-belt, wp ) It's worth to pay extra for quality material for seal to leak proof with another 100K. I wouldn't do the job twice just to remove everything again to replace 10 bucks parts! I got bite once on Camry 5SFE 2.2 with cam seal leak. Lucky that was not quite difficult to remove just to remove the cam seal! The rest are aftermarket (hydraulic adjuster, idler pulley, tension pulley, ps belt, alt belt). The standard labor time is around 6 hrs, but i spend well more than 8hrs getting tool to tackle the sea install! ONE NOTE before install the seal is clean up the area. TRUST ME on this! I had ruin seal without practice! LUBE the inner and outer seal fully with lubricant Or WD40 for easy install. Be careful guide and push the sealin as far as it can with thumb pressure . Here it the fun part, push it evenly with cam seal tool, some kind of similiar size deep socket, or even tap with 1/4" extension. Keep the seal lube until all in flush with housing. DONE? The rear cam sprocket and cam seal is quite a challenge to remove without any cam holder tool! That is why i get more access taking off the wiper assembly bracket out of the way! I did remove the cam sprocket with OTC 4754 cam holder and remove the seal with Lisle seal puller which I and Bronzemaxwell recommended. GREAT TOOL with fulrcum action!! Make sure you whiteout a own mark at the rear cam pulley with the undercover for easy reference! At the TDC the rear & front pulley has (I)mark align with the back side cove (I)notch. The crank TDC look little bit trcky! The triangle symbols on crank gear align with the arrow on the housing body! The circle dot is for OEM timing belt crank installation mark! YES! OEM! I should have upload all the photo details but not able to post it because of the high resolution file! The WP is pretty straight forward, the remove of 2 long studs will give more access ONLY if it can be loosen with E torx or vise grip! Otherwise just leave it in there if don't BUDGE at all! BE CAUTION not to break them. The trick is to jack up the engine few inches on the oil pan with wood protected. The WPump will slide out through the stud easily! I highly recommend using metal gasket over other type. The side engine support bracket mount on the same hole at the WP which has quite a torque on it so the metal gasket can withstand the crushed force! Using OEM red coolant is recommended since the radiator is all aluminum! I went for extra mile replacing with OEM 82 C thermostat as well as radiator cap for preventive overheated measure. At last filling up and bleeding the cooling system is vital for the engine normal temperture. Start the vehicle, the idle will be noticeable lower than usual. The Idle and engine will resume normally once the air is purge from the system. Make sure cooling fan are cycling and top off the cooling system! I spent additional 2 hrs more decide to replace radiator as well! I use all those labor $$$ for all parts! I will try post up photo future! BIG THANKS for those chip in these resource and info! I wouldn't be success at this repair without them!