Well I’m happy I got these! I’ve run these before on a 2013 Prius V which allowed me to tow a camping trailer so I knew they would work but I wasn’t sure about the fitment advertised on Firestone’s website since they say these same air springs were also compatible on previous generation Siennas.
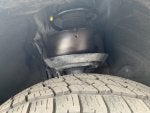
These are the Firestone Coil-Rite 4155s
Installed by RhinoPro Truck Outfitters in Phoenix, AZ.
These were out of stock on etrailer.com but I found them available on Amazon.com
It’s raining right now so I haven’t played with the air pressure yet to get it sitting quite level hence why the rear is higher then the front.
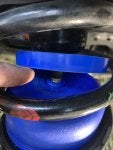
 . Comes with the minivan territory, I suppose.