Toyota Sienna Forum - siennachat.com banner

DIY Blend door actuator repair with photos!

148K views 62 replies 44 participants last post by  >2Life  
#1 · (Edited)
DIY Blend door actuator repair plus dead motor cleaning & photos

Finally my wife's '05 Sienna XLE driver side blend door actuator was begging for replacement. About 18 months ago the forum posts here and elsewhere helped me make a temporary and superficial repair to the driver's side actuator but this time it wasn't working. The previous repair was to remove the actuator, open the case, bend the 3 copper contacts upward to make better contact with the underside of the large gear and apply some dielectric grease to improve continuity.

This time that fix didn't work and the intermittent problem would last for days, blowing cold air in winter time (unacceptable!). After Advance Auto, NAPA, and Pep Boys told me they couldn't even get the part I was resigned to purchase the part from Toyota tomorrow. As such, I figured there was no harm in going all out to fix or break the part trying. Previous research told me that there were contact points on the back of the large gear and three copper arms which made contact with these points which provide feedback to the control unit about the position of the arm/blend door. I knew if I could remove the arm, I could remove the large gear, clean the contacts and bend the contact arms back into position to make good contact with the gear. Prying on the arm to remove it has no effect. The parts were probably ultrasonically welded and well fused together. Applying heat from a paint stripping gun softened the arm but did not break the bond.

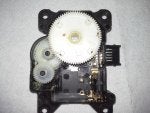
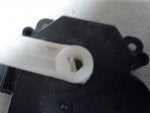
The arm has a "cap" on the end which obscures the end of the axle. I wanted to see the end of the axle to see if there was a way to separate the two. The first thing I did was use a hacksaw to cut off about 1/4" of the "cap" part of the arm which covered the end of the axle. This revealed the end of the axle which has a flat keyway section. Heating it better defined the margin between the arm and the axle. Separation appeared possible (maybe).
View attachment 16121 View attachment 16145
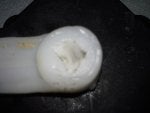
For mechanical separation, the heated tip of an Xacto knife did the trick. Following the outline of the axle and keyway, I alternately heated then plunged the knife between the arm and axle until I worked my way all the way around, presumably separating the pieces.

I applied some prying force and managed to separate the arm but broke off part of the end of the axle. There appeared to be plenty of axle and keyway left to reconnect the arm (proven correct later on). I used a screwdriver to punch out the piece of broken axle left in the arm. This provided for easier re-installation of the arm.
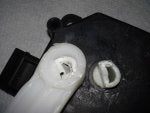
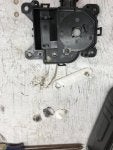
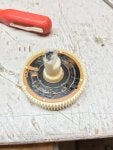
Once the arm was off, the large gear could be removed. There was plenty of black, greasy build-up on the back of the gear and one of the copper contact arms was noticeably lower (farther from the gear) than the others. I suspect this was the main culprit of the problems.
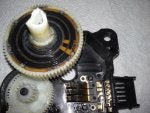
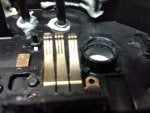
View attachment 16089 View attachment 16089
View attachment 16089
Once apart, I cleaned the gear and copper arms, bent the arms upward, applied dielectric grease to both parts, and reassembled.
View attachment 16097 View attachment 16105 View attachment 16113

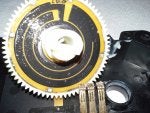
To reinstall the arm, I considered epoxy but that would leave me in the same predicament of disassembly if another repair were needed. The axle is hollow and the keyway section created a choke point. A panhead screw seemed to do the trick and allows me to disassemble in the future. The mix door is not heavy and doesn't create outward pressure on the arm/axle joint, so I figured a screw probably work just fine.
I am happy to report that initial testing and a test drive were successful. It seems to work perfectly. Only time will tell if this fix holds up, but it saved me $150 for the part and the total repair time is about 30 minutes. If you decide to give it a try, good luck to you.

Take the time to cut the arm/axle weld all the way around and as deep as you can. There is a shoulder below the keyway so only cut about halfway the depth of the arm in this area. I hope this helps!
 
#4 ·
Hi docg2,

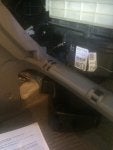
No disassembly is required to get to the actuator. A Sienna with dual zones will have 2 actuators, driver side & passenger side. Our problem was the driver's side. It can be accessed from the floor of the driver's side, behind the center of the dash near the floor. Basically to the right of the accelerator pedal. A search here will reveal more detail on how to remove it, but it's relatively simple.

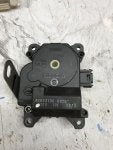
This thread has photos showing the acutators, called "airmix damper servo sub-assembly".

http://www.siennachat.com/forum/64-general-discussion/151290-removing-blend-door.html
 
#46 ·
Hi docg2,

No disassembly is required to get to the actuator. A Sienna with dual zones will have 2 actuators, driver side & passenger side. Our problem was the driver's side. It can be accessed from the floor of the driver's side, behind the center of the dash near the floor. Basically to the right of the accelerator pedal. A search here will reveal more detail on how to remove it, but it's relatively simple.

This thread has photos showing the acutators, called "airmix damper servo sub-assembly".

http://www.siennachat.com/forum/64-general-discussion/151290-removing-blend-door.html
If this does not belong here please delete
I am working on the 08 Siena XLE I have hot air blowing on the driver side when a/c is on I replace the actual on the driver side and no change but I ran across a post on line and they said replace the one above it has a piece of metal that it bolts to I just need to know does anybody knows what it is called so I could order one sorry so long
 
#5 ·
Captmoose: Excellent job! I apparently missed this previously, but I've moved it to the Gen-II board. I'm also stealing your photos so that maybe I can use them to help the next guy with HVAC issues. ;-) Somehow I always seem to get dragged into this type of repair....
 
#8 · (Edited)
Just wanted to drop a line here, as this and the linked post really helped. I did the driver's side airmix servo in under 30min. It fixed that problem but revealed a few others.

It seems it wasn't only the drivers side servo motor that was on the fritz.
Here's what the old was doing (video):
https://picasaweb.google.com/113269285636978370799/2008ToyotaSiennaXLEAWD#6197888458181154402

Once it was replaced, thought I was great... only now notice this crazy noise.
https://picasaweb.google.com/lh/photo/a0n6K968102ElVGGnM64k9MTjNZETYmyPJy0liipFm0

This appears to be the "mode damper servo sub-assembly", I'm not sure what it does but it's sounding very much dead/near death.

Also, the passenger side is now blowing a little cooler than it should...so that servo is probably done/close to done as well.
So... yeah.... fixed one...two more to do it appears.

Did anyone else have these servo motors have issues all close to one another?
 
#9 ·
Hi. I hope you don't mind me barging in on your thread. I just repaired the actuator on my 05 Sienna. I actually took the box apart using the snaps and left the big wheel in place. I cleaned everything up, then reached behind the big wheel with a piece of 90 degree metal and bent all the contacts up. Put it back together and it's working fine. Your way is more though, but my way is a little easier. I don't know if mine will last or not. I'll keep in touch.
 
#10 ·
When you had this part opened up, did you notice if there is a little dc motor inside. The reason I ask is that I just replaced the 12 volt motor in a door part. The door part alone was ~$100, but the little motor was ~$5. Replaced the electric motor and fixed the problem. Interested to see if that little trick might apply here as well assuming all of the other components are fine. I will have to look when I take out the old part. Just curious if you noticed. Thanks
 
#14 ·
Well, looks like the motor is shot. I had the actuator out and apart in under 10 min thanks to my previous mod. After checking the brushes and re-bending to ensure good contact it was still dead. I jumped the motor directly off the battery and it is dead. I can feel it "bump" when turning the shaft but its DOA. Where did you source the motor? It simply sits in the casing so it could not be simpler to remove and replace.
 
#12 ·
I purchased one on eBay and the other two on Toyotapartsdeal.com
I just replaced all the HVAC servos at the same time, kept my old ones that weren't chattering...but two out of three were talking it up ^^^videos above.

Ebay: TOYOTA 8710608070 GENUINE OEM SERVO $177
ToyotalPartsDeal
87106-08060 SERVO SUB-ASSY, DAMP
[Sienna | 2008 | 2GRFE | WG | XLE | ATM | 5D | 7S | GSL25L-PFAQKA] 1 119.45 119.45
87106-08050 SERVO SUB-ASSY, DAMP
[Sienna | 2008 | 2GRFE | WG | XLE | ATM | 5D | 7S | GSL25L-PFAQKA] 1 119.45 119.45

I'm sure you might be able to beat those prices from Sept 2015. I tried to get some off a part-out in Atlanta, GA but he had already sold the whole dash.
 
#16 · (Edited)
I purchased one on eBay and the other two on Toyotapartsdeal.com
I just replaced all the HVAC servos at the same time, kept my old ones that weren't chattering...but two out of three were talking it up ^^^videos above.

Ebay: TOYOTA 8710608070 GENUINE OEM SERVO $177
ToyotalPartsDeal
87106-08060 SERVO SUB-ASSY, DAMP
[Sienna | 2008 | 2GRFE | WG | XLE | ATM | 5D | 7S | GSL25L-PFAQKA] 1 119.45 119.45
87106-08050 SERVO SUB-ASSY, DAMP
[Sienna | 2008 | 2GRFE | WG | XLE | ATM | 5D | 7S | GSL25L-PFAQKA] 1 119.45 119.45

I'm sure you might be able to beat those prices from Sept 2015. I tried to get some off a part-out in Atlanta, GA but he had already sold the whole dash.
Johnmharte - What's the trick in removing these parts especially the one on the top(87106-08050. I removed the two screws but it seems hung up. Do you recommend just replacing these with new ones or fixing existing ones?

Thank you
 
#13 ·
We still have the Sienna and the repair seems to have lasted nearly 3 years before rearing its head again. The driver side is only blowing warm air again so I'll tear into it this week to see what's up. I'm hoping it is just a matter of readjusting the brass contact brushes. If not, it may be the servo motor. I'll come back to post an update.
 
#15 · (Edited)
OK then. It looked like a replacement motor was out of the question so started looking online for a whole new assembly. The best I could do was $115. With that in mind, I Googled "small DC motor repair" and found a few YouTube videos of motors being repaired simply by cleaning out the gunk and dust that builds up over time. Figuring with nothing to lose and a lead on an affordable new unit I'd give it a shot. As I mentioned, the motor would "bump" with power applied, but not spin even if you gave it a twist to try to get it started so it seemed to want to work.

To disassemble, there are a number of indentations around the top rim of the case which hold the plastic end on. This end also contains the 2 brass contacts. I tried unsuccessfully to pry back all those little indents by tapping a small screwdriver against the indents. The motor case was placed in my opened vise but only to brace it with the top rim that I was working on against the vice jaw toward me. This gave the rim support as I tapped. It looked like the end cap should have come out but it wouldn't budge. I was about to give up before completely destroying the end cap or case, but realized that the shaft seemed to be spinning just a little easier. Power was applied and the motor came to life! However, I didn't trust the "probable dislodging of internal goop" as a reliable long-term solution but at least we had a faint pulse to build upon. So lets see if we can clean the internals without disassembly.

There is a rubber o-ring around the center hub of the plastic end cap. Remove it and you will find 2 oval holes. There are also 2 small round holes in the end cap. Could I get enough electrical cleaner into the casing through these small ports? Would it further bugger up the motor? I'm here to say yes, with the red straw on the spray can nozzle, one can flood the case; and no it didn't bugger up the motor. Just do it with the motor end cap facing away from you. Some cleaner will splash right back toward the spray can with gusto so point things in a safe direction with that in mind. I then shook out as much fluid as possible and used low pressure compressed air to dry the internals. A drop of oil on the shaft at each end, spin by hand several times and she works perfectly now. Re-assembly and testing in the Sienna proved the repair worked.

Good luck with your repair, should you attempt it.

FYI, I have now broken off all but 2 of the tabs that hold the 2 halves of the black assembly housing together. It holds together just fine while it is removed for service and once attached in the van the 3 mounting screws further hold it all together so don't sweat it if you accidentally break some off.

I keep telling my wife it's the Swede in me that enjoys a good repair challenge and not the cheap bastage trying to save a buck. Ok, maybe a little of both and its $115 bucks still in my pocket. Hope this helps you out.
 

Attachments

#17 ·
There are three screws, that's the first tip. ;)
https://www.dropbox.com/s/ecv28pd4ywwqu64/2015-10-03 09.11.19.jpg?dl=0
Each part has at least 3 screws.
You have to pull away from where they are installed, aka pull directly backwards to get the guide notches loose. Then make sure the little guides line back up into the grooves on reinstall.
https://www.dropbox.com/s/r2g5hr445rtydeu/2015-10-03 09.11.09.jpg?dl=0

I would recommend just replacing the parts. They weren't that bad all together, under $300 if I recall.
I wouldn't purchase used parts for this either as many of our cars seem to face this issue with the actuators.
 
#18 ·
Johnmharte - do you need to remove trim panel to get to the third screw closer to the radio on the large cam gear for the top one?

Al three servos are acting up for me. Both passenger and driver side.
Also do the electrical contacts go bad on these where they dirty and not making contacts?

Thank you
 
#19 ·
I removed the lower trim panels and the glovebox area. That gave me enough room but it was very tight.

As for the contacts, I tested the old ones on the bench, just giving them power, and tested them in the car as well, it didn't matter how I moved the contacts/ect.... all of mine were still not moving smoothly/ect. So, I don't think it's cleaning thing.
In my case they all started to fail within in 3-4 weeks of each other. The driver and center units were the worst. The passenger was still working mostly but I just changed it anyway... as I didn't want to do this again for a while.
 

Attachments

#23 ·
Thanks for the post, this saved me time and money.

Both the passenger and driver side actuators didn't move at all on a 2008 Sienna XL. I suspected maybe a fuse had blown but measured the driver side actuator connector and was getting voltage as I moved the temperature control.

Thanks to this post: http://www.siennachat.com/forum/66-...nce-repair/9077-passenger-side-ac-servo-motor-air-mix-blend-door.html#post58589 I didn't have to dissamble the dashboard to get into the passenger side actuator.

So I proceeded to open up the actuator (very easy just held by little tabs).
I took off the motor and attached some gator clips so I could test it directly - I just hooked into the car battery - the motor worked just fine.
So I thought maybe it's a load issue, so I put the motor back in, still gatored the clips, mechanism moved just fine even with counter force applied to lever.
So I took off the motor again, and I exercised the lever back and forth a bunch of times to try and clean up the contacts underneath the gear attached to the lever.
I put the case back together and plugged into the connector again. Voila! It started calibrating and moving again.

I proceeded to do the same with the passenger side actuator - which is easier to cleanup because you actually access the track and the pins when disassembled.

So I got to save $300 and I have heat again.
 
#24 ·
I took out my damper and followed your idea. I used an oscillating saw to cut off the tip of the arm( see pics) to get the cover off. Inside I found some gunk on the contacts and cleaned off. I wasn?t sure if it would work as the contact area seemed worn off but it seems to be working... fixed the arm back on with a screw. Easy fix!
 

Attachments

#26 ·
2005 XLE Limited 209k

I replaced both of these units - drivers and passengers about 2 years ago and just after the 1 year warranty - the crazy clicking noise came back for both units - its off and on but usually wild clicking on those long drives to FL - driving me crazy but the wife doesn't ever seem to notice!

So, my 2 cents its in the design - buying new did not solve the issue in my case. So, going for a DIY repair to extend the life / make an adjustment seems the way to go IMO.

There are a few Youtube videos out there under a guy named Froggy that tried to repair these units for a Lexus model as apparently the same design flaw is carried into those vehicles.

Shawn
 
#28 ·
Our front two servos both have problems at same time. One seems to have stopped working entirely (driver side blows warm air), and the other one makes a tapping noise but seems to still work. There are YouTube videos of that particular problem. The guy in the video was able to stop the clicking noise by cleaning the internal servo contacts. I'm going to try the same thing in the near future.