

I’ve installed heated seats on my 2012 Sienna SE. This is my very first experience in car modding. It took me about 10hrs of research, and another 15hrs for the installation. This forum helped me a lot so I would like to share my experience in detail to help others. I posted a lot of pictures to help noobs like me
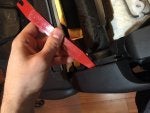
I’ve bought Carbon Fiber heating seat pads kit with a round high/off/low switch (about 60$ on Amazon). This kit covers 2 seats (both cushion and back) and they are very long (pads are about 19 inches in lenght, plenty to warm your legs and mid back). I've also bought plastic trim remover tools to avoid breaking clips and leave marks on the plastic (see picture). Those tools were essentials.
![]()
![]()
My first observation was that there are factory seat heater switches harnesses already in place (beside the front cup holder), along with two dedicated 15A fuses in the fuse box (fuses S-HTR FL and S-HTR FR (#35 and #36)). I initially wanted to reuse the switch harness to power the seat heater but I’ve found that was not possible. According to Toyota Electrical Wiring Diagram, the dash switches are not powered by the two seat heater fuses (it is in fact powered by "ECU IG 1" fuse that handles a lot of other critical stuff) , which makes those switch improper to pull power from. The seat heater fuses should bring power directly to the seats but I could not locate those wires (they probably stop at a junction box somewhere). So bottom line, the seat heater switch harnesses in the dash is not reusable in an aftermarket seat heater installation.
First, I’ve removed the second row seats because the front seats will need to go through the sliding doors.
I removed the headrests of front seats, and the 4 bolts under each seats. If you have electrical seats, make sure you position them appropriately BEFORE unplugging the battery otherwise bolts will be a pain to remove. Also consider that the electrical seats backrest will remain in this position for the whole process, so make sure the backrest is upright at a nice 90 degrees (or slightly more) angle.
Then, I’ve unplugged the negative battery cable and let the seats airbags discharge for 3 minutes before unplugging the seats (Toyota officially recommend 90 seconds).
Once seats unplugged, I brought them inside (I don’t have a garage, and it is -25C/-13F outside) on a table and started removing the plastic around the base of the cushion. The passenger seat (mechanical) is easier to dissasemble. It only have plastic on both sides (not in front), which are retained by 1 screw and 2 clips each. those are easy to spot and unclip. At the base of the backrest, I had to use a plastic trim remover to unclip plastic parts. Be careful, I broke a few clips but is not affecting the result.
![]()
The driver driver seat (electrical) was a bit more complicated since there are 3 plastic sides, tightly clipped together. I’ve managed to disassemble them, leaving only the side with the electrical controls. You don’t need to remove it.
Remove the armrest on the seat, you only need to pull the plastic plug and remove a bolt.
![]()
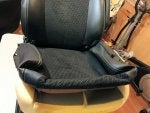
The cushion covers are clipped under the seats to the metal frame. Thee space is limited but you can unclip with your fingers, or using a plastic trim remover.This is the result :
![]()
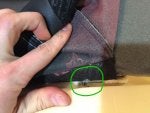
Now the hardest part is to deal with the hog rings. I had no hog ring pliers. I could not simply cut the rings (like professionnals do) and install new ones. Space is limited and very thight under the cover. DONT TRY to open each ring using 2 long-nose pliers as is took me forever before I found a better technique. Only use one long-nose plier and twist open the ring. I've reused the same rings for re-installation. Hog ring pliers are not necessary if you don't plan to reuse them.
![]()
![]()
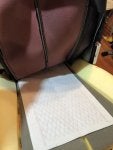
There are 3 vertical seams on the cushion, running from front to back. Those are retained by 4 hog rings each. I could not install the seat heated pad because of the center seam which prevent the pad to lay flat. I’ve thought of keeping 50% of the seam and cut the pad the other 50%, but any kind of hole in the pad would cut it's heating efficiency , and may make the seats looks visually 50% OK and 50% modified (making it easy to notice every time you enter your car). Somes sites suggested to replace hog rings with Velcro strips, but the harsh side of velcro can get noisy (you hear screech-screech each time you move your butt), and i’ve feared it could damage the pad or the seat cover in the long run. Finally, the simplest way was to discard the center hog rings and lay the pad flat. I’m glad I did because I can not even tell the difference. The seat cover still stay firmly in place, without any loose. I recommend this method for a professional look.
![]()
![]()
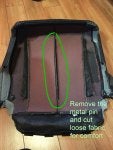
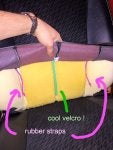
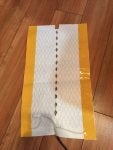
Now the backrest. The left and right seams are kept in place using pink rubber straps attached to the lower back of the backrest. , and the center seam is kept in place using special (non-harsh, non-noisy) velcro. The compromise was to partially cut the heating pad covering the velcro. The cover will still stick to the openings in the pad, but i’ve feared it may loosen over time. I’ve added spots of glue to glue the cover to the pad, and the pad to the seat along the factory velcro. The result is virually perfect, no trace of any modification. So far so good !
![]()
![]()
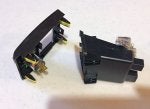
Under both seats, I’ve plugged both pads to the relay and tie-wrapped them to have a clean look. There are two connectors for the seats heaters : power connector and switch connector.
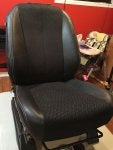
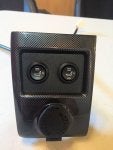
The result is very nice :
![]()
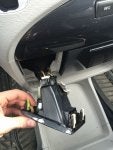
I've decided to use the original factory switch location, left to the front cup holders (where the original harnesses are). To remove this part, simply pull it starting from the bottom, with your fingers.
![]()
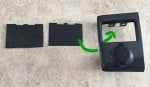
On this plate, I've removed the inside compartment and cut black plastic to create the switch holders. I initially ordered "Install Bay ABS plastic" from Amazon but texture looked too cheap and not classy enough. I've decided to cover it with soft-to-the-touch plastic cut from the back of a black DVD case. The result is very professional and classy. The plastic switch holder is held to the plate using Mighty Putty (not shown in the picture). I love Mighty Putty !
![]()
![]()
![]()
Now in the van, I've removed the center console to run the wires. There are two bolts inside, and two in the front. To remove the front ones you have to simply pull the black cup holders straight upwards to uncover them.
I did not remove the bottom floor part separating the console from the dash, it was not necessary to run the wires under each side of it. Here is a schema :
![]()
![]()
Both seats power + (red wire) goes to the fuse box, and plugged using two "add-a-circuit" component. I've used the two seat heater fuses (as they are powered only when the ignition is ON).
Both seats power - (black wire) goes to a grounded bolt under the passenger seats.
Reassemble the center console and reinstall the seats. Plug everything back and voilà !
I don't have pictures of the finished look (I've finished at night, could not take pictures, but will post it when i have the chance.
Contact me if you have questions
Enjoy your heated seats
Marc
I’ve bought Carbon Fiber heating seat pads kit with a round high/off/low switch (about 60$ on Amazon). This kit covers 2 seats (both cushion and back) and they are very long (pads are about 19 inches in lenght, plenty to warm your legs and mid back). I've also bought plastic trim remover tools to avoid breaking clips and leave marks on the plastic (see picture). Those tools were essentials.


My first observation was that there are factory seat heater switches harnesses already in place (beside the front cup holder), along with two dedicated 15A fuses in the fuse box (fuses S-HTR FL and S-HTR FR (#35 and #36)). I initially wanted to reuse the switch harness to power the seat heater but I’ve found that was not possible. According to Toyota Electrical Wiring Diagram, the dash switches are not powered by the two seat heater fuses (it is in fact powered by "ECU IG 1" fuse that handles a lot of other critical stuff) , which makes those switch improper to pull power from. The seat heater fuses should bring power directly to the seats but I could not locate those wires (they probably stop at a junction box somewhere). So bottom line, the seat heater switch harnesses in the dash is not reusable in an aftermarket seat heater installation.
First, I’ve removed the second row seats because the front seats will need to go through the sliding doors.
I removed the headrests of front seats, and the 4 bolts under each seats. If you have electrical seats, make sure you position them appropriately BEFORE unplugging the battery otherwise bolts will be a pain to remove. Also consider that the electrical seats backrest will remain in this position for the whole process, so make sure the backrest is upright at a nice 90 degrees (or slightly more) angle.
Then, I’ve unplugged the negative battery cable and let the seats airbags discharge for 3 minutes before unplugging the seats (Toyota officially recommend 90 seconds).
Once seats unplugged, I brought them inside (I don’t have a garage, and it is -25C/-13F outside) on a table and started removing the plastic around the base of the cushion. The passenger seat (mechanical) is easier to dissasemble. It only have plastic on both sides (not in front), which are retained by 1 screw and 2 clips each. those are easy to spot and unclip. At the base of the backrest, I had to use a plastic trim remover to unclip plastic parts. Be careful, I broke a few clips but is not affecting the result.
The driver driver seat (electrical) was a bit more complicated since there are 3 plastic sides, tightly clipped together. I’ve managed to disassemble them, leaving only the side with the electrical controls. You don’t need to remove it.
Remove the armrest on the seat, you only need to pull the plastic plug and remove a bolt.

The cushion covers are clipped under the seats to the metal frame. Thee space is limited but you can unclip with your fingers, or using a plastic trim remover.This is the result :
Now the hardest part is to deal with the hog rings. I had no hog ring pliers. I could not simply cut the rings (like professionnals do) and install new ones. Space is limited and very thight under the cover. DONT TRY to open each ring using 2 long-nose pliers as is took me forever before I found a better technique. Only use one long-nose plier and twist open the ring. I've reused the same rings for re-installation. Hog ring pliers are not necessary if you don't plan to reuse them.

There are 3 vertical seams on the cushion, running from front to back. Those are retained by 4 hog rings each. I could not install the seat heated pad because of the center seam which prevent the pad to lay flat. I’ve thought of keeping 50% of the seam and cut the pad the other 50%, but any kind of hole in the pad would cut it's heating efficiency , and may make the seats looks visually 50% OK and 50% modified (making it easy to notice every time you enter your car). Somes sites suggested to replace hog rings with Velcro strips, but the harsh side of velcro can get noisy (you hear screech-screech each time you move your butt), and i’ve feared it could damage the pad or the seat cover in the long run. Finally, the simplest way was to discard the center hog rings and lay the pad flat. I’m glad I did because I can not even tell the difference. The seat cover still stay firmly in place, without any loose. I recommend this method for a professional look.
Now the backrest. The left and right seams are kept in place using pink rubber straps attached to the lower back of the backrest. , and the center seam is kept in place using special (non-harsh, non-noisy) velcro. The compromise was to partially cut the heating pad covering the velcro. The cover will still stick to the openings in the pad, but i’ve feared it may loosen over time. I’ve added spots of glue to glue the cover to the pad, and the pad to the seat along the factory velcro. The result is virually perfect, no trace of any modification. So far so good !
Under both seats, I’ve plugged both pads to the relay and tie-wrapped them to have a clean look. There are two connectors for the seats heaters : power connector and switch connector.
The result is very nice :
I've decided to use the original factory switch location, left to the front cup holders (where the original harnesses are). To remove this part, simply pull it starting from the bottom, with your fingers.
On this plate, I've removed the inside compartment and cut black plastic to create the switch holders. I initially ordered "Install Bay ABS plastic" from Amazon but texture looked too cheap and not classy enough. I've decided to cover it with soft-to-the-touch plastic cut from the back of a black DVD case. The result is very professional and classy. The plastic switch holder is held to the plate using Mighty Putty (not shown in the picture). I love Mighty Putty !
Now in the van, I've removed the center console to run the wires. There are two bolts inside, and two in the front. To remove the front ones you have to simply pull the black cup holders straight upwards to uncover them.
I did not remove the bottom floor part separating the console from the dash, it was not necessary to run the wires under each side of it. Here is a schema :
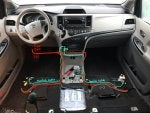

Both seats power + (red wire) goes to the fuse box, and plugged using two "add-a-circuit" component. I've used the two seat heater fuses (as they are powered only when the ignition is ON).
Both seats power - (black wire) goes to a grounded bolt under the passenger seats.
Reassemble the center console and reinstall the seats. Plug everything back and voilà !
I don't have pictures of the finished look (I've finished at night, could not take pictures, but will post it when i have the chance.
Contact me if you have questions
Enjoy your heated seats
Marc


