Toyota Sienna Forum - siennachat.com banner

How to replace rear speakers in 2011+ Sienna (step by step with pics)

1 reading
70K views 54 replies 21 participants last post by  javvy  
#1 ·
Background: the rear speakers in the 2011+ Sienna are not easy to change due to a lack of speaker brackets that you can use to mount aftermarket speakers as well as very limited space to fit new speakers. Without resorting to modifying your car (e.g. cutting stuff to make more room), the best option to replace your stock speakers is to use the existing rear speaker as a mounting bracket for the new speakers. You do this by cutting out the existing speaker, leaving the "frame" that you can then use as a mounting bracket by attaching (screwing) aftermarktet speakers to them. This is all detailed below. Also, you have to note that due to the very limited depth available, you will be limited in choice of speakers. The ones I used (Kicker CS65/40CS654) are just about the only 6.5" speakers that I could find that were shallow enough to fit, although there may be others (if you find any, let us know!) that fit also.


Not completely step by step, but for the most part. Here it is:


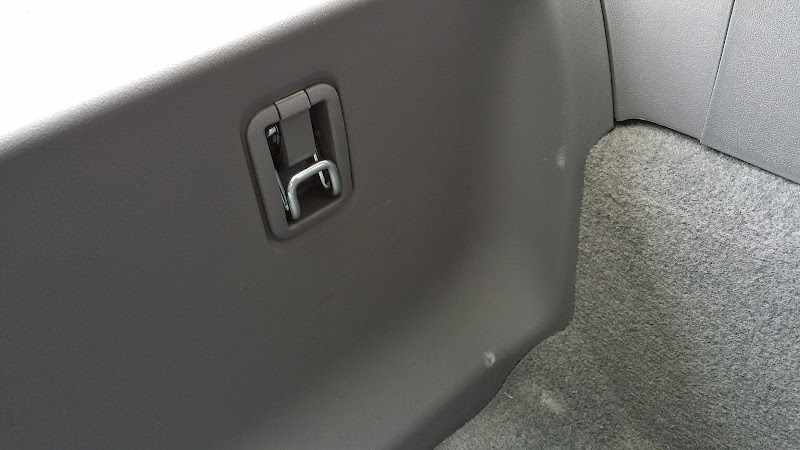
Step 1: Remove rear scuff plate (below lift gate).

a.) Raise the metal connection "loops" in the scuff plate

Image


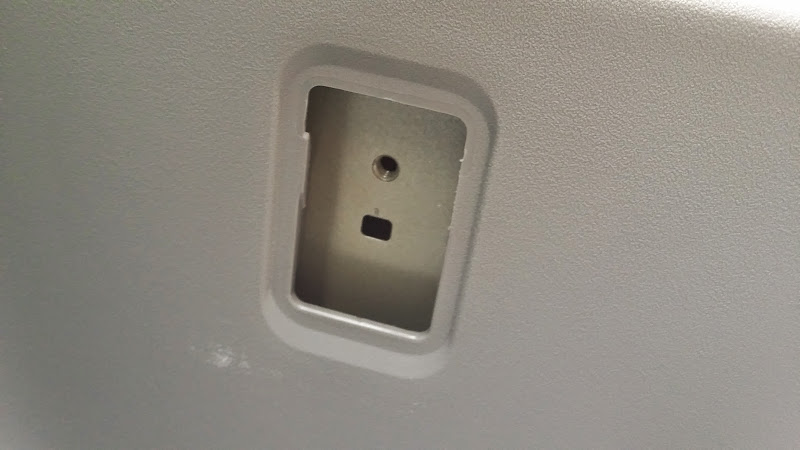
b.) There is a plastic tab below the loops that needs to be unsnapped and lifted (squeeze the ends together and lift).

Image


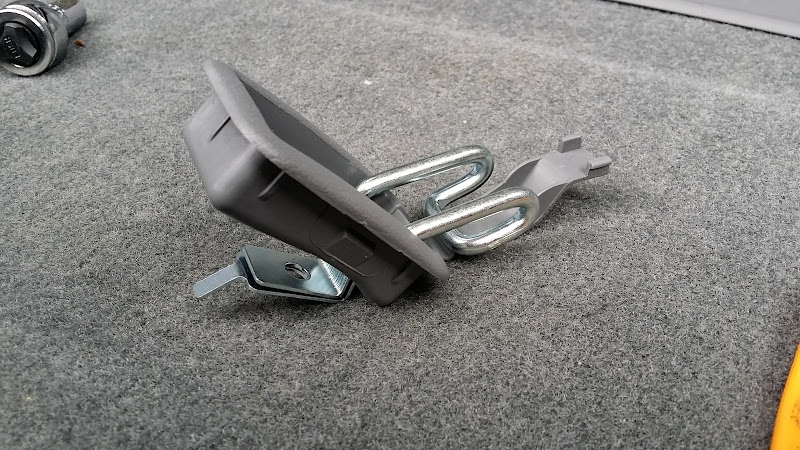
c.) Unscrew the screws below the tab and remove the loop assembly (x3).

Image

Image


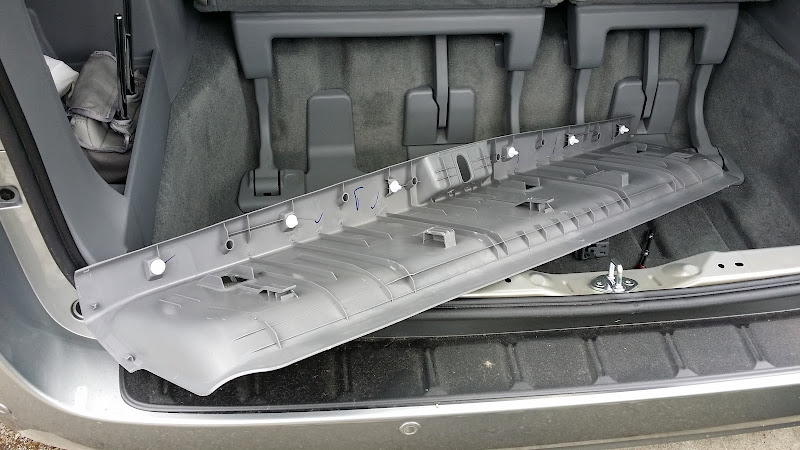
e.) Remove the scuff plate (connects via plastic clips x6) by lifting it up.

Image


Step 2: Remove side scuff panel (below sliding doors). Removing these will enable you to pull out the side trims that cover the rear speakers more easily, making it less difficult to remove the speakers.

a.) Simply pull/lift up to remove. It's attached via several clips and can be removed with only a little effort.
 
#2 ·
Step 3: Start pulling out the interior trim pieces. The way I did this was by doing what was minimally needed to remove the speakers, therefore, I did not completely remove these trims as I was not sure how involved that would be and exactly how they are connected beneath the surface. It worked fine for me though and made it super easy to stick back together (took only minutes).

a.) Start pulling out the gray trim shown (connected by clips).

Image


b.) Keep pulling! The gray trim piece is connected to the upper white trim beneath the pop out windows (which contains the speaker grille) but it is not necessary to separate the gray and white trims, although they may come apart during the process of pulling them out.

Image


c.) Pull out the white and gray trims at the front end (behind the sliding door now). Everything connects via clips.

Image


d.) The one **WARNING** I have is to be careful when pulling out the gray and white trims in the step above. In the pic above, you can see where the white and gray trims separate. There is a plastic tab, that is not removable and which can break easily during the removal process, that you NEED TO BE CAREFUL NOT TO BREAK OTHERWISE THE TWO TRIM PIECES WILL NOT COMPLETELY STAY ALIGNED WHEN YOU PUT THE TRIM BACK TOGETHER!! Yes, this is a bit disappointing to break it, but you can "unhook/clip" the tab joining the two trim pieces if you push in on the white trim while pulling the gray trim. See pic below (taken from the opposite side trim which I did not break).

Image


e.) Remove rear speaker! At this point, the trim pieces are not completely removed so you need to pull the trim back while unscrewing the bracket/speaker. They attach via 10mm bolts x3. I would use a ratcheting socket wrench due to limited space to maneuver. One is deeper and two are at the front end. Unhook the speaker harness and remove.

Image


f.) Remove the bolts (x2) that are next to the stock magnet cutout. You need to remove these unless you get a really, really shallow speaker or one with a ridiculously tiny magnet like the stock one. The bolts are easy to remove with a 10mm socket wrench and do not have any washer or interior pieces that you have to worry about dropping into the cavity behind the side trim. They do connect two "layers" of sheet metal though, so do at your own risk. If I had thought of it at the time, I would have tried to screw the back in from the interior side and then chopped off the part that sticks out using my Dremel tool, but I didn't think of it and have no plans to do so at this time. Hope the car doesn't fall apart on the highway. :p

Edit: As ddcha reported previously, these two bolts do not need to be removed for the Kicker CS65 (40CS654) speakers (which have a 1-11/16" top mount depth so other speakers with similar mounting depth and magnet size will probably fit without removing those bolts as well). I verified that today after I went through all the hassle of installing the rear speakers again just to put those screws back in. Glad once it was done though, as I never felt good about removing them in the first place.

Image


Now you've successfully removed your stock rear speaker, well done!

Image
 
#3 ·
Step 4: Gutting the stock speaker to use as a mounting bracket for your new speakers. Note, the depth you have to work with is very shallow, so be advised that I cannot vouch for any speaker that is deeper (top mount) or protrudes more than the Kicker CS65 that I used (which has 1-11/16" top mount depth and 5/16" frontal protrusion).

Here is what the stock speaker looks like from the side:

Image


a.) Remove the speaker cone from the frame with a knife.

Image


b.) Now cut off the "spokes" with a Dremel tool, hacksaw, utility knife, or other appropriate tool. You can probably leave the foam on the top of the speaker mount/frame but I peeled it off just it case.

Image


c.) Mount your speaker on the gutted stock speaker frame by drilling holes with a drill bit and impact driver and screwing them in. You may want to consider sawing off the protruding part of the screws as they could potentially hit the metal due to the shallow mounting space, although I didn't and it seems to be fine. A 6.5" speaker should fit nicely. Just be careful you mount it on the right side! And note that the orientation that it mounts as the speaker wires should point downwards when mounted, not upwards (hint: the stock speaker wiring harness points downwards so use that to orient yourself).

Image


d.) Install the new speakers using the bolts (x3). It can be a little bit of a tight squeeze and the interior bolt can be difficult to access easily with your wrench since the trim pieces are not completely off, so I would recommend lightly screwing in the front two bolts and trying the deep 3rd bolt afterwards. Then tighten all three down at the end.

Image


Now, you're done installing your new speaker. Now wasn't that easy? Just be careful of that tab I mentioned above! You don't want to break it (sniff)...


Step 5: Put it all back together (no pics as it's straightforward). This part is super easy, just push all the partially removed trim pieces back in and reinstall the scuff plate and metal loop attachment assemblies.
 
#5 ·
Thanks so much for posting these. I might attempt this and take a trip to the hardware store to look for a flat head replacement for the 2 bolts you removed. Do you have enough clearance for a flat head bolt??
Not sure exactly how much space there is behind the Kicker magnet and those bolts, so not totally sure but I imagine it would fit. One thing you could do (which I probably should have tried first) is to leave the bolts in and see if your speaker fits. Not sure why I didn't even try it, but I should have!

Also, forgot to post this but here are the stock and Kicker speakers side by side, to get a sense of the relative depths.

Image

Image
 
#8 ·
Thanks for doing g the writeup!
No prob, glad to help! I wish I had some guidance too when doing it as I had no idea what I was getting myself into, but I was glad that it turned out to be fairly simple.

Nice,very helpful post,do you think kicker 40CS6934 or DSC693 6 X 9 will fit in the the front using gutted stock speaker frames? Thanks.
Yep, I think if you use the stock speaker as a mount, you could most likely fit a good number of 6x9 speakers as there is quite a bit of depth (I've read 4", which sounds about right to me) in the front doors (of course, you want to install them with the windows down to make sure it won't hit the window). I was able to fit a adapter bracket with a Metra plastic speaker baffle which is quite deep, so I would say most likely it would fit.

6x9 speakers in the front door along with some tweeters in the sail panel or dash would be a nice setup. The bass in my JL Audio components is pretty weak, but with the Kickers in the rear it "fills" out the sound due to the increased bass from the Kickers and it sounds great together, but better bass from the front doors would be nice for when I'm driving with the kids and the volume in the back is turned down.
 
#9 ·
Not sure exactly how much space there is behind the Kicker magnet and those bolts, so not totally sure but I imagine it would fit. One thing you could do (which I probably should have tried first) is to leave the bolts in and see if your speaker fits. Not sure why I didn't even try it, but I should have!

Also, forgot to post this but here are the stock and Kicker speakers side by side, to get a sense of the relative depths.


Image

Image
From your pictures, it appears as though the Kickers would fit without removing those 2 bolts...
 
#11 ·
From your pictures, it appears as though the Kickers would fit without removing those 2 bolts...
You may be right, although I suspect it'll be a very close fit if it does actually fit. I have no idea why I didn't try that first.

very nice job, clears up all the confusion for folks that consider replacing rear speakers, Thanks
Yep, from what others who had done it before said it seemed like a mission impossible, while in reality it's actually very doable. Not more difficult than doing the front door speakers at least. And a looooot easier than replacing my rear deck speakers on my 2002 Civic coupe, which still gives me nightmares...
 
#12 ·
You may be right, although I suspect it'll be a very close fit if it does actually fit. I have no idea why I didn't try that first.


Yep, from what others who had done it before said it seemed like a mission impossible, while in reality it's actually very doable. Not more difficult than doing the front door speakers at least. And a looooot easier than replacing my rear deck speakers on my 2002 Civic coupe, which still gives me nightmares...
One more question. How much space is there from the face of the speaker to the body panel that covers it? I'm wondering if I can just space it a little more to make the magnet fit without removing bolts.
 
#14 ·
One more question. How much space is there from the face of the speaker to the body panel that covers it? I'm wondering if I can just space it a little more to make the magnet fit without removing bolts.
Not sure, but I imagine not much as from the pic you can see the foam on the top surface of the speaker, which probably contacts the inner plastic "rim" of the grille. You would probably have to trim the plastic rim a bit to make some more space, which you could probably do with a Dremel tool and gain another few milimeters of space (maybe up to 5mm if you do it well).

h4ldol, do you happen to remember which color wires were positive and negative for the rear speakers? I'm in the process of replacing my HU and rear/dash speakers.
Nope, I put in new wire for all 4 speakers so I have no idea since I didn't use the old speaker wires/brackets, sorry.

[edit] I found this on modifiedlife.com:

2011 Toyota Sienna Car Radio Wiring Instructions
Car Radio Battery Constant 12v+ Wire: Blue
Car Radio Accessory Switched 12v+ Wire: Gray
Car Radio Ground Wire: Brown
Car Radio Illumination Wire: N/A
Car Stereo Dimmer Wire: N/A
Car Stereo Antenna Trigger Wire: N/A
Car Stereo Amp Trigger Wire: N/A
Car Stereo Amplifier Location: N/A
Car Audio Front Speakers Size: N/A
Car Audio Front Speakers Location: N/A
Left Front Speaker Positive Wire (+): Pink
Left Front Speaker Negative Wire (-): Violet
Right Front Speaker Positive Wire (+): Light Green
Right Front Speaker Negative Wire (-): Blue
Car Audio Rear Speakers Size: N/A
Car Audio Rear Speakers Location: N/A
Left Rear Speaker Positive Wire (+): Black
Left Rear Speaker Negative Wire (-): Yellow

Right Rear Speaker Positive Wire (+): Red
Right Rear Speaker Negative Wire (-): White
 
#15 ·
So many thanks to h4Idol. I replaced my rear speakers today! took me about an hour and a half. The kickers fit without replacing those two bolts. And I love how they sound. I had upgraded my front door speakers a while back and my system sounded so unbalanced (all the sound was coming from the front doors and I could barely hear the rear. Now with the new Kickers, it definitely sounds more balanced. Love this mod. In terms of tips, dremel is a must. And for some reason, I didn't need to remove the rear kicker panel or the back of the panel. I just went straight for the side panel where the speaker is. Metra easy connectors also fit and made this super easy.
 
#16 ·
So many thanks to h4Idol. I replaced my rear speakers today! took me about an hour and a half. The kickers fit without replacing those two bolts. And I love how they sound. I had upgraded my front door speakers a while back and my system sounded so unbalanced (all the sound was coming from the front doors and I could barely hear the rear. Now with the new Kickers, it definitely sounds more balanced. Love this mod. In terms of tips, dremel is a must. And for some reason, I didn't need to remove the rear kicker panel or the back of the panel. I just went straight for the side panel where the speaker is. Metra easy connectors also fit and made this super easy.
Great, congrats!

I'm surprised you could pull the side trim enough without pulling out the rear side panels (I found it too tight to remove the speakers). And I agree about the Kickers making the over sound balanced -- exactly how I felt.

Thanks for the tip of the bolts, I guess I'll need to go back and put them back in now though!
 
#17 ·
So many thanks to h4Idol. I replaced my rear speakers today! took me about an hour and a half. The kickers fit without replacing those two bolts. And I love how they sound. I had upgraded my front door speakers a while back and my system sounded so unbalanced (all the sound was coming from the front doors and I could barely hear the rear. Now with the new Kickers, it definitely sounds more balanced. Love this mod. In terms of tips, dremel is a must. And for some reason, I didn't need to remove the rear kicker panel or the back of the panel. I just went straight for the side panel where the speaker is. Metra easy connectors also fit and made this super easy.
Did you use the same exact speakers as h4Idol? Kicker DSC65 with lower power range is what im planning to use since I dont think Ill replace my HU yet.Do you think it will fit too?
thanks.
 
#18 ·
Did you use the same exact speakers as h4Idol? Kicker DSC65 with lower power range is what im planning to use since I dont think Ill replace my HU yet.Do you think it will fit too?
thanks.
The DSC65 have the same 1-11/16" top mount depth as the CS65, and the tweeter doesn't seem to protrude much, so it should probably fit just as well. The two speakers (CS65 and DSC65) look identical, actually.
 
#19 ·
Did you use the same exact speakers as h4Idol? Kicker DSC65 with lower power range is what im planning to use since I dont think Ill replace my HU yet.Do you think it will fit too?
thanks.
Yes, same speakers as h4idol. They are great. Why go with the lower power ones? I think they are basically the same price or maybe a $10 difference. The reviews online overwhelmingly favor the CS654 over the DSC65
 
#20 ·
Yes, same speakers as h4idol. They are great. Why go with the lower power ones? I think they are basically the same price or maybe a $10 difference. The reviews online overwhelmingly favor the CS654 over the DSC65
He mentioned he wants to keep his stock HU, and I'm assuming he's not using an amp so doesn't want to underpower them (CS rated at 100W RMS and DSC rated at 50W RMS).
 
#21 ·
He mentioned he wants to keep his stock HU, and I'm assuming he's not using an amp so doesn't want to underpower them (CS rated at 100W RMS and DSC rated at 50W RMS).
I'm using my stock HU with no amp. Didn't think about the underpower issue. Still produces deeper richer sound with stock HU as compared to the stock speakers. So are you saying that the DSC speakers would sound louder with the stock HU?
 
#23 ·
I would assume so ddcha since it wont be power hungry as the CS unless a member with better knowledge could further elaborate before I make my choice.
I spoke to a really knowledgeable rep at Crutchfield who clarified the difference between the two speakers. The CS654 is "last year's version" of the DSC654. Kicker decided to lower the max wattage specs for the CS because people assumed they needed an amp to power them. This however is not the case. The minimum wattage requirement is identical. He also told me that the sensitivity is identical at 90db so the loudness of the speakers using the same HU would be the same. All other specs are the same. The only difference is that if you did decide to get an amp down the road, the DS might not be able to handle the higher power. So that's what I've learned.
 
#24 ·
I spoke to a really knowledgeable rep at Crutchfield who clarified the difference between the two speakers. The CS654 is "last year's version" of the DSC654. Kicker decided to lower the max wattage specs for the CS because people assumed they needed an amp to power them. This however is not the case. The minimum wattage requirement is identical. He also told me that the sensitivity is identical at 90db so the loudness of the speakers using the same HU would be the same. All other specs are the same. The only difference is that if you did decide to get an amp down the road, the DS might not be able to handle the higher power. So that's what I've learned.
Thank you for the clarification ddcha.
 
#25 ·
I spoke to a really knowledgeable rep at Crutchfield who clarified the difference between the two speakers. The CS654 is "last year's version" of the DSC654. Kicker decided to lower the max wattage specs for the CS because people assumed they needed an amp to power them. This however is not the case. The minimum wattage requirement is identical. He also told me that the sensitivity is identical at 90db so the loudness of the speakers using the same HU would be the same. All other specs are the same. The only difference is that if you did decide to get an amp down the road, the DS might not be able to handle the higher power. So that's what I've learned.
I'm no audio expert by any means, but that sounds a bit odd to me. Sounds like he's saying that it was a marketing decision to decrease the max RMS rating by actually re-engineering it to handle less power but without changing anything else, which is just strange. They could simply state a lower RMS without actually changing the actual product if that is indeed the only difference between the DSC and CS, and then there wouldn't be an issue of the speaker distorting or getting damaged with higher RMS from an amp. In any case, powering speakers with an amp at the very least should allow for higher volumes of audio to be played without distortion (or damage to the speakers).
 
#26 ·
I'm no audio expert by any means, but that sounds a bit odd to me. Sounds like he's saying that it was a marketing decision to decrease the max RMS rating by actually re-engineering it to handle less power but without changing anything else, which is just strange. They could simply state a lower RMS without actually changing the actual product if that is indeed the only difference between the DSC and CS, and then there wouldn't be an issue of the speaker distorting or getting damaged with higher RMS from an amp. In any case, powering speakers with an amp at the very least should allow for higher volumes of audio to be played without distortion (or damage to the speakers).
Im confused now, based on the specs h4Idol, which one hould I get for my stock HU? Lower or higher RMS?