Toyota Sienna Forum - siennachat.com banner

Which stock wires to use to connect stock backup camera to aftermarket receiver?

124K views 45 replies 22 participants last post by  h4ldol  
#1 ·
I just bought a Kenwood receiver with a RCA input for backup camera. The Sienna, of course, has a bunch of wire harnesses and no RCA cables. I looked at a bunch of threads here and on TN and it seems that my best bet is to find the video+ and video- wires from one of the stock wire harnesses and cut them and solder them onto a RCA plug. And then connect the receiver's backup wire to the backup trigger wire on one of the stock wire harnesses. The question is, which wires do I use? I saw a thread on TN that mentions that you can use the #3, 15, and 16 plugs on the harness, but I looked at my stock wire harnesses and none of them have 16 plugs, so not sure if that's referring to a stock harness or not.

Anyone have any info that could help me figure which wires to connect to a RCA plug to use my stock camera?

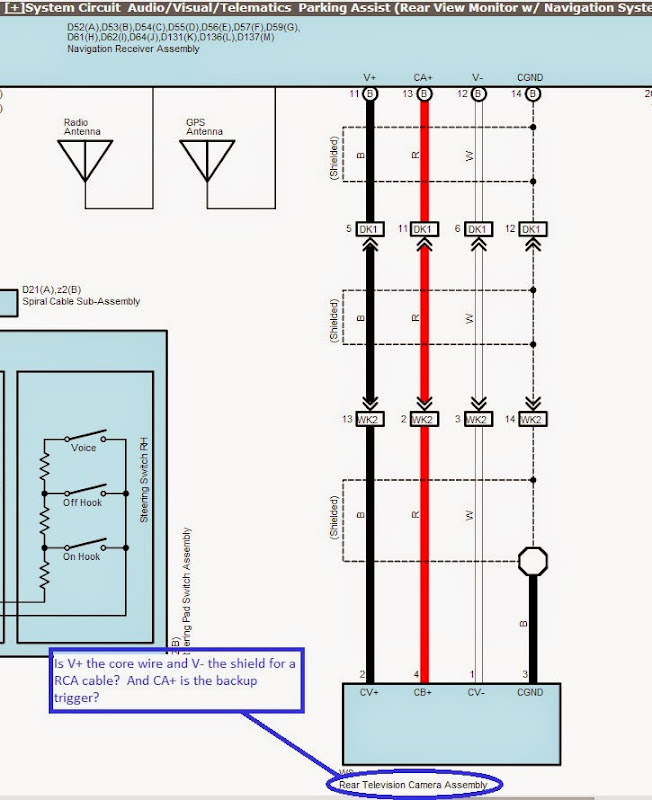
edit: here's a photo of the wiring schematic from the Toyota tech website that seems to show the wiring for the backup camera. Is this correct? So I should look for a harness with 3 wires (red, black, white) and connect the black wire (V+) to the RCA core wire, the white (V-) wire to the RCA shield, and the red wire to the backup trigger? Only problem is that when I looked at all the wire harnesses connected to the stock stereo, none of them have only those wires (there are three harnesses with other wires in addition to white, red, and black).

Is there anywhere that I can get a specific harness pin layout of the wires?

Image
 
#3 ·
Thanks, I'll have to check at home but in my XLE the backup camera shows up only on the HU screen (not the little screen under the center dash grille), so I don't think mine will probably have those wires connected to the little screen.

It looks like the stock HU gets video from one of the many wire harnesses connecting to the back of the HU. Question is which one... from the pdf I linked it looks like it's a black harness with 4 plugs in a square shape, but that may be the connection at the camera because I wasn't able to find such a harness behind the dash.
 
#4 ·
I tested with a multimeter today and the power cable to the stock backup camera is, indeed, about 6V (actually, fairly consistently ~6.7V), and is powered when the car is in reverse or not. The reverse wire that goes into the stock navi HU provides about 13V but only when in reverse. Given that my multimeter is not top of the line ($55 from Lowe's), it's probably safe to say that the stock backup camera gets 6V all the time when the car is on (didn't test ACC vs ignition though) and the reverse wire to the stock HU gives 12V but only when in reverse.

So it seems that to use the stock backup camera with an aftermarket HU in a Sienna with navigation package (i.e. doesn't have the convenient wires going to the small display under the center dash grille since the backup camera displays on the stock HU only), you will need to:

1. Connect the backup camera's input power wire ("CA+" on the wiring schematic above) to a 12V power source (e.g. by splicing into the 12V ACC wire from the stock wire harness or by using a fuse tap to use power via the fuse box) via a 12V>6V step down converter that will reduce the 12V (probably best to use ACC than Batt so it's only 12V switched) to 6V. Probably a good idea to put a fuse in between the two (12V source and backup camera), which is easier if you use a fuse tap.
2. Connect the reverse wire (from the stock wire harness) to the aftermarket HU's reverse detection wire to display the video from the backup camera when in reverse.
3. Connect V+/V- wires (from the backup camera via wiring to a RCA male connector) to the aftermarket HU's RCA female input jack for video input from the backup camera to the HU.
4. Connect the ground wire (from the backup camera) to the stock (brown) ground wire in the stock wire harness.

A bit of a pain but at least now I know what to do.

I'll be using this (http://www.amazon.com/gp/product/B00CXKCRME/ref=oh_details_o00_s00_i00?ie=UTF8&psc=1) 12V>6V converter that I found off a TN thread about the same issue.
 
#6 ·
Finally finished the installation and the stock backup camera now works great with my new Kenwood receiver, but what a PITA to install everything! I would still do it again, as having an aftermarket receiver blows the stock navigation HU out of the water, but it was challenging with a bit of a learning curve. The 4 steps listed two posts above did work and the stock camera works just fine with my aftermarket receiver.

I didn't take too many pics but I may take a few pics tomorrow of the finished installation before I put the trim pieces back on to give a visual on what the connections look like. All you need is some basic wire soldering/crimping skills and know which wires to cut and connect and how to do it, which I've detailed above and will add some visuals later.
 
#7 ·
Nice job! I think it was you that I responded to previously in another post that the Toyota cameras were 6v main power. An odd choice, but hey, it's Toyota and they can put in non-standard stuff and then charge you $500 for a replacement if you blow it up!

Given the ultra-low power requirement, I had suggested a simple two resistor voltage divider. I did this years back to trick a sensor that was giving me a constant annoying warning light on my dash. Those little modules on Amazon are quite nice and are the right way to go. Thanks for the tip. Prior to seeing this, I'd most likely visit Radio Shack and grab an LM7806 (any voltage DC to 6 volt DC linear voltage regulator IC). Probably what's in your module anyway, along with a heat sink and maybe a filter cap.

Again, well done!
 
#8 ·
Nice job! I think it was you that I responded to previously in another post that the Toyota cameras were 6v main power. An odd choice, but hey, it's Toyota and they can put in non-standard stuff and then charge you $500 for a replacement if you blow it up!

Given the ultra-low power requirement, I had suggested a simple two resistor voltage divider. I did this years back to trick a sensor that was giving me a constant annoying warning light on my dash. Those little modules on Amazon are quite nice and are the right way to go. Thanks for the tip. Prior to seeing this, I'd most likely visit Radio Shack and grab an LM7806 (any voltage DC to 6 volt DC linear voltage regulator IC). Probably what's in your module anyway, along with a heat sink and maybe a filter cap.

Again, well done!
Thanks, I couldn't have done it without the 12V>6V converter (definitely did not want to even try making something like that on my own). :8)

Anyway, I ended up being too lazy to take any pictures before putting all the stuff back together but here's the final result:

Image
 
#10 ·
so does the small screen still kick on when you're in reverse? I have mine kick both on but wanted to disable the smaller screen. :)
His has the Navigation/entune package which shows the back cam from the HU and not from the small screen. So it took him awhile to figure the proper wiring connection. I'm in the process of doing mine too with a scosche dash kit . My taste for the metra dash kit is not appealing to me.
 
#11 ·
Thanks, I couldn't have done it without the 12V>6V converter (definitely did not want to even try making something like that on my own). :8)

Anyway, I ended up being too lazy to take any pictures before putting all the stuff back together but here's the final result:

Image
Good job and neat install.
 
#12 ·
Good job and neat install.
Thanks!

so does the small screen still kick on when you're in reverse? I have mine kick both on but wanted to disable the smaller screen. :)
See below. I imagine this would be simple as "diverting" the camera video wires (V+/V-) from the small screen wiring harness to the HU (by making a RCA cable like I did). You should leave the ground (if there is one) and power wires connected to power and ground the camera. Since the power wire supplies 6V to begin with, you won't need to bother with the 12V>6V converter, which is really nice.

edit: if you already have it all hooked up, I assume you tapped/spliced into the small screen wiring harness to get the video to your HU. You can probably just cut the V+/V- wires that connect to the small screen wiring harness so that the video feed goes only to the HU. That should do the trick (of course, you may want to leave a bit of cable sticking out of the wiring harness in case you want to reconnect it later).

His has the Navigation/entune package which shows the back cam from the HU and not from the small screen. So it took him awhile to figure the proper wiring connection. I'm in the process of doing mine too with a scosche dash kit . My taste for the metra dash kit is not appealing to me.
I think the Metra kit is okay, the color is pretty well matched and it the receiver attached pretty easily. Not fond of the plastic brackets but that's probably the same for the Scosche kit I would guess.
 
#13 ·
I realize I didn't actually show which wires you need in order to connect the stock camera to an aftermarket stereo, so here are a few pics of the stock wire harnesses behind the HU that you need to use. Note: all pics of wire harnesses were taken before any cutting/modification was done, so this is what you will/may see behind your factory HU (it may vary a bit depending on your Sienna trim; mine is a 2014 XLE AWD with 6-speakers and navigation/Entune).

1. Cut the black wire and connect it to the aftermarket HU's reverse sensor wire (typically a blue/yellow wire).

Image


2.
a. Cut and solder the black (V+) and white (V-) wires (the ones coming out of the car, not from the adapter bracket, which will not be used or connected to anything) to the core and shield parts, respectively, of a (cut) RCA cable. The RCA cable will go to the HU video (RCA) input jack. Be careful to insulate the core from the shield wires (I used 3M 33+ electrical tape) to prevent any electrical shorts.
b. Cut and connect the orange ground wire to some sort of chassis ground -- either the brown ground wire (by "tapping" into the brown wire, not by cutting it and then connecting it!) on the power/audio wire harness (see pic in step 3) or to some metal part that you think is grounded to the chassis. I ended up connecting a wire with a loop connector to a one of the screws near the HU that inserts into metal (because I had 6+ ground wires from the camera, steering wheel control adapter, and 12V>6V converter, to ground to so I spliced them all to that single ground wire). It seems to be working okay (for now at least).
c. Cut and connect the red power wire to the output side of a 12V>6V converter (this supplies 6V to the backup camera).

Image


3. Supply 6V to the red wire (step 2). You have a couple options, including the following two. #1. You can use the stock power/audio harness that connects to your HU via one of those Metra wiring harness adapters. The blue is 12V battery (always on) from the car battery and the gray wire next to it supplies 12V when ignition is in the "ACC" position. This (gray/12V ACC) is the wire you can use to connect to the input side of the 12V>6V converter in the step above. I actually didn't use this because I didn't want to mess with this wire (since it's thin and connects to the HU and I didn't want any potential problems). #2. You can use a fuse tap connected to the power outlet fuse (which is also only powered when in ACC or ignition) underneath the steering wheel and run a cable to the 12V>6V converter to supply it with 12V. This is preferable IMO also because it has a fuse to protect the camera. I used that fuse tap cable to also supply power to my PAC audio steering wheel control adapter box (before the converter for 12V).

Image
 
#15 ·
These instructions for connecting the OEM camera to my aftermarket head unit don't work on my 2013 LE (no Entune). I tried reversing the polarity of the plus and minus connections and that didn't work, either.

I'm grateful to the original poster of these instructions, but he doesn't make clear which Toyota head unit he started with. There's no "one size fits all" when it comes to wiring.
 
#16 ·
These instructions for connecting the OEM camera to my aftermarket head unit don't work on my 2013 LE (no Entune). I tried reversing the polarity of the plus and minus connections and that didn't work, either.

I'm grateful to the original poster of these instructions, but he doesn't make clear which Toyota head unit he started with. There's no "one size fits all" when it comes to wiring.
If you have the small backup camera in your 2013 LE, I don't see no reason why it should not work and it should not matter if you have the base XLE or LE. You may need to double check your wiring connection. Make sure the reverse trigger wire is connected properly aside from the video plus/negative wire.
 
#17 ·
These threads have been very helpful, but I'm having an issue getting the backup camera to display on the aftermarket HU.

The basics:
-2012 Sienna LE with stock head unit Model P1842. Stereo and stock backup camera worked fine before all mods.
-Replaced HU with Pioneer AVIC-6100.
-Tapped into backup sensor wire at the wiring harness for the stock backup camera, and that works fine. When I put the vehicle in reverse, the screen on the Pioneer HU goes black and I see the distance lines.
-Tested the 'BC' input on the Pioneer HU by using an RCA input from a portable dvd player and it works fine. With that connected to the HU, when I put the vehicle in reverse I get an image.
-I stripped part of the wire for pin 14 (black wire, RCA +) and pin 15 (white wire, RCA -). I then cut an RCA cable and stripped back the coatings so I have an inner + bare wire and an outer ground/negative bare wire. When I connect those wires (inner RCA to black wire; outer ground to white wire), I'm not getting a backup camera image on my Pioneer HU. I do still get a backup image on the small stock screen.
-I used http://alexapps.net/toyota-sienna-aftermarket-gps-navigation/ as a guide, plus the video that's in this thread http://www.siennachat.com/forum/67-mobile-electronics/156649-2012-toyota-sienna-stereo-unit-2.html as guides.

What am I doing wrong???
Here's a picture of the wires I'm using.
1 - white and black wires for rca
2 - Black + rca wire tap
3 - White - rca wire tap
4 - Successfully soldered backup sensor tap


Any input would be helpful. I'm going crazy here!! Of course this is the one thing the wife absolutely must have is the larger backup image and it's the one thing I CANT get to work! :mad:


Thanks,
Brian
 
#44 ·
These threads have been very helpful, but I'm having an issue getting the backup camera to display on the aftermarket HU.

The basics:
-2012 Sienna LE with stock head unit Model P1842. Stereo and stock backup camera worked fine before all mods.
-Replaced HU with Pioneer AVIC-6100.
-Tapped into backup sensor wire at the wiring harness for the stock backup camera, and that works fine. When I put the vehicle in reverse, the screen on the Pioneer HU goes black and I see the distance lines.
-Tested the 'BC' input on the Pioneer HU by using an RCA input from a portable dvd player and it works fine. With that connected to the HU, when I put the vehicle in reverse I get an image.
-I stripped part of the wire for pin 14 (black wire, RCA +) and pin 15 (white wire, RCA -). I then cut an RCA cable and stripped back the coatings so I have an inner + bare wire and an outer ground/negative bare wire. When I connect those wires (inner RCA to black wire; outer ground to white wire), I'm not getting a backup camera image on my Pioneer HU. I do still get a backup image on the small stock screen.
-I used AlexApps.Net as a guide, plus the video that's in this thread http://www.siennachat.com/forum/67-mobile-electronics/156649-2012-toyota-sienna-stereo-unit-2.html as guides.

What am I doing wrong???
Here's a picture of the wires I'm using.
1 - white and black wires for rca
2 - Black + rca wire tap
3 - White - rca wire tap
4 - Successfully soldered backup sensor tap
View attachment 5529


Any input would be helpful. I'm going crazy here!! Of course this is the one thing the wife absolutely must have is the larger backup image and it's the one thing I CANT get to work! :mad:


Thanks,
Brian
i have sienna 2021 and need to add auxiliary or RCA how i can do
 
#18 ·
I'm no electrical expert, but I wonder if the problem you're having is related to your RCA cable and use of the "taps" to make the connections. I wasn't clear what type of RCA cable you used, but you want to use a single RCA connector cable (that is, a cable with only one RCA connector on each end). You chop off (and discard) the connector on one end, then when you peel off the outer insulation layer on the single connector RCA cable there is that circumferential layer of thin strands that makes up the "shield". You should twist those together and solder to a wire that connects to the V- wire in the wire harness (that goes to the small LCD screen where your stock backup camera feeds into) and then solder the main wire (there's only one) in the RCA cable to the V+ wire in the wire harness. Just make sure to use electrical tape around the shield and the main wire connections to avoid getting any electrical shorts.
 
#19 ·
These instructions for connecting the OEM camera to my aftermarket head unit don't work on my 2013 LE (no Entune). I tried reversing the polarity of the plus and minus connections and that didn't work, either.

I'm grateful to the original poster of these instructions, but he doesn't make clear which Toyota head unit he started with. There's no "one size fits all" when it comes to wiring.
I have a 2014 XLE with entune and 6 speakers, non-JBL (mentioned in post #13 above).

It really depends on whether your Sienna has the small screen below the center dash speaker grille and displays the backup camera there, or if it just shows it on the main HU (like on mine). It's pretty straightforward if you have the small screen since you just connect to the wires connected to it. Otherwise, you will need to do something like what I did, which is more convoluted but very doable nonetheless.
 
#20 ·
I am using the instructions in this thread to connect an Eclipse camera in my 2007 Sequoia to a new Pioneer head unit. I have my RCA cable ready. I just bought a 12v to 6v reducer on Amazon. It is a Smakn brand. It has four wires coming out of it. a + and - for 12v side and a + and - for the 6v side. Do I need to use all of these wires? I'm a noob when it comes to wiring/electricity, but I was able to install the new head unit with no issues.
Any help would be appreciated!!
 
#21 ·
Those wires should be for power and ground. I would connect them all. But if you're using an aftermarket camera you may not need to go through all the hassle I went through, as that was due to needing to connect a stock Sienna backup camera which is 6V. Your Eclipse camera probably requires 12V to begin with, no?
 
#42 ·
What did you end up doing with the yellow "extra wire"? I can't get my rear camera to work.


Thanks, Brett
Those wires should be for power and ground. I would connect them all. But if you're using an aftermarket camera you may not need to go through all the hassle I went through, as that was due to needing to connect a stock Sienna backup camera which is 6V. Your Eclipse camera probably requires 12V to begin with, no?
There's a 4th yellow wire on the output of my Smakn 12v-6v reducer. Followed instructions exactly. Everything works except for the factory rear camera.
 
#24 ·
Hi, I just wanted to say thank you for the great write-up. I was able to follow this to install my Pioneer AVH-4000NEX in my 2013 Sienna XLE with factory NAV while retaining the factory backup camera.

Scosche dask kit
Image


Monster cable, only the best!
Image


The wiring harness
Image


Steering wheel control box

Steering wheel control plug and play and retain factory AUX IN port

12V -> 6V converter

USB retention cable

I used these to tap the video + / video -, backup camera power, and reverse gear sensor in the van so I didn't have to cut and splice any wires.

The only word of warning I will give you is if you have factory NAV like I did you might not be able to use any of the dash kits. My trim piece for the factory stereo was all one piece with the vents molded in!
Image


I actually had to buy a different factory trim piece to make this all work, part # 5540508020B0. It's about $235 from a dealer new, but I managed to find one for $100 used from an auto recycler on eBay.


Overall I'm happy! It was a bit more than I wanted to spend to install but I'm excited to have Carplay back in my road trip vehicle!
 
#25 ·
Hi, I just wanted to say thank you for the great write-up. I was able to follow this to install my Pioneer AVH-4000NEX in my 2013 Sienna XLE with factory NAV while retaining the factory backup camera.
Looks great! Glad to hear it worked out for you. Thanks for sharing your install pics too.

I also found out about the different dash trim you need if you have factory navigation when I was trying to put it all back together, and had to pay $200+ to get it from an online dealer since I didn't want to wait at the last step and it didn't seem easy to find. If I could do it over though, I would have used some of those wiring harness adapters so that I didn't have to cut all the original harnesses to make the connections and splices. Guess it doesn't matter too much though.

I've thought about getting a CarPlay HU too but I really don't want to mess around with the HU at all for at least a few more years. :)

Enjoy your new stereo, looks nice!
 
#26 ·
I recently installed a kenwood deck into my 2012 Sienna se. Followed all the instructions and everything works perfectly except that my kenwood deck has a back up camera button that you can press for 3 seconds while in any gear or driving and the rear camera will come up. With my current install I am able to get the camera to come up but it shuts off after some time. I tested to make sure if it happens after going certain speed but could not determine it since it randomly shuts off. Any ideas how to bypass this?
 
#27 ·
I have a Kenwood too (see my sig for specific model) and I know what feature you're talking about. I am able to use it in my Kenwood (I assigned it to the "tel" button I think and it shows the rearview camera view continuously until I toggle it off) so not sure why yours doesn't stay on. I do use a little bypass device so that I can play DVDs on the monitor while driving (for my kid to watch on the rear monitor) but that isn't involved with the rearview camera at all. What model Kenwood do you have? And it comes on and stays on when you're in reverse?

You could also try calling their customer service. I think I called them due to some issues with DVD playback with my Alpine rearseat monitor and IIRC they were pretty helpful.
 
#28 ·
Hey it's an old kenwood DNX5120. I just grounded the parking wire which bypassed the DVD mode while driving. I didn't have to do anything else for that. But rear camera is pissing me off. These are the instructions thatch i followed. Everything works. Both screens come up while in reverse.
(Black) pin 3 - Reverse signal. This becomes 12V signal when transmission is in reverse. Check it with tester if you have one.
(Black w/ Silver dots?) pin 14 - Video+. Center connection on RCA plug.
(White) pin 15 - Video-. Shield of RCA plug.

So can you tell me where the tel line got connected.