

DIY Blend door actuator repair plus dead motor cleaning & photos
Finally my wife's '05 Sienna XLE driver side blend door actuator was begging for replacement. About 18 months ago the forum posts here and elsewhere helped me make a temporary and superficial repair to the driver's side actuator but this time it wasn't working. The previous repair was to remove the actuator, open the case, bend the 3 copper contacts upward to make better contact with the underside of the large gear and apply some dielectric grease to improve continuity.
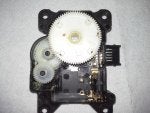
This time that fix didn't work and the intermittent problem would last for days, blowing cold air in winter time (unacceptable!). After Advance Auto, NAPA, and Pep Boys told me they couldn't even get the part I was resigned to purchase the part from Toyota tomorrow. As such, I figured there was no harm in going all out to fix or break the part trying. Previous research told me that there were contact points on the back of the large gear and three copper arms which made contact with these points which provide feedback to the control unit about the position of the arm/blend door. I knew if I could remove the arm, I could remove the large gear, clean the contacts and bend the contact arms back into position to make good contact with the gear. Prying on the arm to remove it has no effect. The parts were probably ultrasonically welded and well fused together. Applying heat from a paint stripping gun softened the arm but did not break the bond.
![]()
![]()
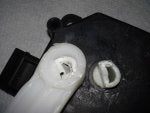
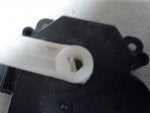
The arm has a "cap" on the end which obscures the end of the axle. I wanted to see the end of the axle to see if there was a way to separate the two. The first thing I did was use a hacksaw to cut off about 1/4" of the "cap" part of the arm which covered the end of the axle. This revealed the end of the axle which has a flat keyway section. Heating it better defined the margin between the arm and the axle. Separation appeared possible (maybe).
View attachment 16121 View attachment 16145
![]()
For mechanical separation, the heated tip of an Xacto knife did the trick. Following the outline of the axle and keyway, I alternately heated then plunged the knife between the arm and axle until I worked my way all the way around, presumably separating the pieces.
![]()
I applied some prying force and managed to separate the arm but broke off part of the end of the axle. There appeared to be plenty of axle and keyway left to reconnect the arm (proven correct later on). I used a screwdriver to punch out the piece of broken axle left in the arm. This provided for easier re-installation of the arm.
![]()
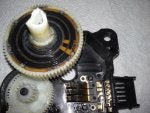
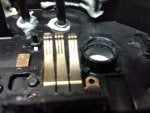
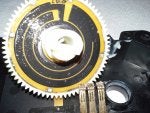
Once the arm was off, the large gear could be removed. There was plenty of black, greasy build-up on the back of the gear and one of the copper contact arms was noticeably lower (farther from the gear) than the others. I suspect this was the main culprit of the problems.
![]()
![]()
View attachment 16089 View attachment 16089
View attachment 16089
Once apart, I cleaned the gear and copper arms, bent the arms upward, applied dielectric grease to both parts, and reassembled.
View attachment 16097 View attachment 16105 View attachment 16113
![]()
![]()
To reinstall the arm, I considered epoxy but that would leave me in the same predicament of disassembly if another repair were needed. The axle is hollow and the keyway section created a choke point. A panhead screw seemed to do the trick and allows me to disassemble in the future. The mix door is not heavy and doesn't create outward pressure on the arm/axle joint, so I figured a screw probably work just fine.
![]()
![]()
I am happy to report that initial testing and a test drive were successful. It seems to work perfectly. Only time will tell if this fix holds up, but it saved me $150 for the part and the total repair time is about 30 minutes. If you decide to give it a try, good luck to you.
Take the time to cut the arm/axle weld all the way around and as deep as you can. There is a shoulder below the keyway so only cut about halfway the depth of the arm in this area. I hope this helps!
Finally my wife's '05 Sienna XLE driver side blend door actuator was begging for replacement. About 18 months ago the forum posts here and elsewhere helped me make a temporary and superficial repair to the driver's side actuator but this time it wasn't working. The previous repair was to remove the actuator, open the case, bend the 3 copper contacts upward to make better contact with the underside of the large gear and apply some dielectric grease to improve continuity.
This time that fix didn't work and the intermittent problem would last for days, blowing cold air in winter time (unacceptable!). After Advance Auto, NAPA, and Pep Boys told me they couldn't even get the part I was resigned to purchase the part from Toyota tomorrow. As such, I figured there was no harm in going all out to fix or break the part trying. Previous research told me that there were contact points on the back of the large gear and three copper arms which made contact with these points which provide feedback to the control unit about the position of the arm/blend door. I knew if I could remove the arm, I could remove the large gear, clean the contacts and bend the contact arms back into position to make good contact with the gear. Prying on the arm to remove it has no effect. The parts were probably ultrasonically welded and well fused together. Applying heat from a paint stripping gun softened the arm but did not break the bond.

The arm has a "cap" on the end which obscures the end of the axle. I wanted to see the end of the axle to see if there was a way to separate the two. The first thing I did was use a hacksaw to cut off about 1/4" of the "cap" part of the arm which covered the end of the axle. This revealed the end of the axle which has a flat keyway section. Heating it better defined the margin between the arm and the axle. Separation appeared possible (maybe).
View attachment 16121 View attachment 16145

For mechanical separation, the heated tip of an Xacto knife did the trick. Following the outline of the axle and keyway, I alternately heated then plunged the knife between the arm and axle until I worked my way all the way around, presumably separating the pieces.

I applied some prying force and managed to separate the arm but broke off part of the end of the axle. There appeared to be plenty of axle and keyway left to reconnect the arm (proven correct later on). I used a screwdriver to punch out the piece of broken axle left in the arm. This provided for easier re-installation of the arm.
Once the arm was off, the large gear could be removed. There was plenty of black, greasy build-up on the back of the gear and one of the copper contact arms was noticeably lower (farther from the gear) than the others. I suspect this was the main culprit of the problems.
View attachment 16089 View attachment 16089
View attachment 16089
Once apart, I cleaned the gear and copper arms, bent the arms upward, applied dielectric grease to both parts, and reassembled.
View attachment 16097 View attachment 16105 View attachment 16113

To reinstall the arm, I considered epoxy but that would leave me in the same predicament of disassembly if another repair were needed. The axle is hollow and the keyway section created a choke point. A panhead screw seemed to do the trick and allows me to disassemble in the future. The mix door is not heavy and doesn't create outward pressure on the arm/axle joint, so I figured a screw probably work just fine.

I am happy to report that initial testing and a test drive were successful. It seems to work perfectly. Only time will tell if this fix holds up, but it saved me $150 for the part and the total repair time is about 30 minutes. If you decide to give it a try, good luck to you.
Take the time to cut the arm/axle weld all the way around and as deep as you can. There is a shoulder below the keyway so only cut about halfway the depth of the arm in this area. I hope this helps!


