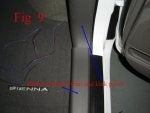
Toyota Sienna Forum - siennachat.com banner
61 - 80 of 85 Posts
I did the door courtesy lights too. Got some clear ones with harness from a Camry, any Toyota since 2007 works since they all have same door panel light. But they have the aftermarket ones all over eBay too. I used the constant 12V at the window regulator I originally used for puddle lights. I ran a wire to the door pin switch wire. I did this about 6 inch from the door pin switch on the B pillar next to front seats. Easiest since it’s only one wire there. I studied the circuit diagram for courtesy lights on several Toyota’s and they have a diode on the ground so I added a diode for good measure. I didn’t take photos of this since it was fairly easy no brained install.

Nice job Sinister2c. Do you mind posting a picture or video with the parking, puddle lights and turn signal lights on? Would love to look at it. Out of topic. Do you have any idea where to connect the courtesy lights on the door? The reason being the SE's don't have it on the door.
 
Puddle lights in complete darkness. Parking lights are very bright.

Compared to the Taiwan 2 in 1 for my 07 IS250, these are bright. The 2 in 1 on the iS use two LED optic rods which provides a subtle parking light. The 4 in 1 sienna uses more direct light.
 

Attachments

See wiring diagrams for a typical Toyota Camry courtesy circuit. I assume Most Toyota are similar. Notice the diode before it hits the node with the door switch pin.

Also they use the dome light 12V but I opted for the 12V constant from window regulators since that power was already in the door when I did the install. I could switch now since I have dome power in each door for my puddle lights. Only advantage with using dome 12V is if kids left front doors option, they power would cut off after 15 mins on sienna.
 

Attachments

Discussion starter · #66 ·
I’m using the MIT inner covers only that don’t fit well. I paid $20 extra for MIT to paint both inner and outers. Still got the tape on outers in the box since I never planned to use them.

Waiting on getting OEM covers til I need some paint work done since Super white and Alpine white signal covers are no longer available in North America.
 
Keep in mind, I did some serious dremel work to get the signals to fit the 2015+ mirror housing. Trimmer the signal mounts and shaved the back to fit.

Also, the signals alone are $145, but with the unpainted inner and outer covers, its $5 cheaper. ?????

Very nice and bright, makes me want to replace my current MIT lamps with these ones. XMas is around the corner and I may end up getting these
Image
 
Discussion starter · #70 ·
Keep in mind, I did some serious dremel work to get the signals to fit the 2015+ mirror housing. Trimmer the signal mounts and shaved the back to fit.

Also, the signals alone are $145, but with the unpainted inner and outer covers, its $5 cheaper. ?????
I only did minor trimming to the turn signal LED and never touch the mirror housing but was using the OEM covers. I'll most likely replace the 2 in 1 with the 4 in one.
 
Discussion starter · #71 ·
Puddle lights in complete darkness. Parking lights are very bright.

Compared to the Taiwan 2 in 1 for my 07 IS250, these are bright. The 2 in 1 on the iS use two LED optic rods which provides a subtle parking light. The 4 in 1 sienna uses more direct light.
Does the parking light lit up with the puddle lights? By looking at the picture on the left, looks like the parking light is also on. Just want to confirm before I take a plunge on the 4 in 1.
 
Does the parking light lit up with the puddle lights? By looking at the picture on the left, looks like the parking light is also on. Just want to confirm before I take a plunge on the 4 in 1.
Nope...the driver side pic also has the parking lights on with puddle. The passenger side is puddle only.

The puddle lights are tied to dome light circuit, so they come on if you turn the dome lights all on, though. I know if you have a car with OEM puddle lights like the Limited, they are on a different circuit that only turns on when door is locked and you unlock it.

On my IS250, the puddle lights only turn on during initial unlock. I don't think they come on if door is opened like dome.
 

I recommend the Signals Only ($130) and buying the OEM covers for the Limited: MIT SIENNA Limited 11-20 LED 4-in-1 SEQUENTIAL turn signal+Parking+puddle light | eBay

Previously installed these MIT $150 signals on OEM non signal mirrors. Used the aftermarket cover which didn’t fit at all which is the reason they come with another outer cover that 3M tapes on.

I ended buying a set of OEM covers in Pearl and had them painted Super White (040 Super White are discontinued since that color was never a North American option on the Limited which has OEM signal mirror). Paid $75 shipped for both covers from BAM Toyota parts.

The version I bought with dual aftermarket covers Painted ($150): MIT Toyota SIENNA 2011-2020 LED turn light+Parking+puddle-mirror cover Painted | eBay
 
Just re-posting your great, detailed write-up for installing LED turn signals as the original post is rather difficult to read/follow due to the small text size and the linked pics. Just made it easier to read but the original content is here. Thanks LetsGoPlaces!


1. Obtain mirror covers and LED turn signal lamps
  • On Ebay from MIT Accessories.
  • Or you can use OEM LED turn signal lamps and make your own wiring.
2. Remove mirror from mirror housing/assembly
  • Tilt mirror down as far as possible and grab mirror from the top and pull mirror slowly towards you 'til it pops out.
  • Tilt mirror motor back up to original position and pull mirror upward to release mirror from mirror motor.
  • Mark 1 heating mirror wire and terminal with marker or painter's tape.
3. Pull out heater wire

- Make sure you put one thumb on the terminal so you won't pry the terminal from the mirror as you disconnect the wire from the mirror.

4. Remove mirror cover
  • TIP: Remove mirror covers while mirror is still attached to the body of the vehicle.
  • Insert nails to hold tabs in position as shown in Fig 3 in picture below one at a time and usually on the last one the mirror cover will just pop out.
46304


5. Remove door panel as shown in video


6. Remove speaker from door

- By disconnecting speaker wire and removing 4 screws as shown in the picture Fig 5 below:

46305


7. Remove mirror assembly from the vehicle

- By unscrewing 3 nuts as shown in picture Fig 4 below.

46306


- Install turn signal lamps to mirror housing using 2 #8 x 3/8 screws shown in Fig 23 in picture below.

46307


  • Would suggest wrapping wiring with electrical tape 3 in. from lamp to about a foot in length.
  • Check here in Fig 22 in the picture below.
46308


8. Remove tape

- Shown in the picture Fig 4 in picture below.

46309


9. Route wire following path of wiring harness from mirror to inside of vehicle

  • You also need to remove plastic cover on bottom of mirror arm and separate insulation/gasket.
  • TIP: start at the bottom gasket/insulation to mid portion where wire enters the vehicle.
  • You don’t need to separate the whole insulation/gasket from the bottom to the top or vice versa.
10. Reinstall mirror housing back and reconnect heater wire

- Do this before re-installation of mirror to mirror motor.

11. Route turn signal mirror wires following factory wiring harness and use zip ties to secure it.

  • Refer to picture Fig 1 in picture below.
  • Loose wiring can be cut or break if wire is in the way of the glass window as it slides down. MAKE SURE WINDOWS ARE UP.
46310


12. Remove rubber grommet between door frame and vehicle
  • This is the rubber that you see in between the door frame and vehicle frame.
  • TIP: Start at the bottom - door frame section as seen in picture Fig 1 in picture below.
  • Get your hand through the speaker door opening and squeeze/pinch the rubber grommet and push it out.
46311
 

Attachments

13. Remove floor panels/kick panel

- As shown in picture Fig 9 in picture below.

View attachment 46312

- Passenger side - you need to remove glove box by taking out 2 screws and 2 10mm bolts as seen in picture Fig 11 in picture below.

46313


14. Unplug this 2 wire harness connector

- As shown in Fig 10 in picture below for passenger side.

46314


- And shown in Fig 8 in picture below for driver side that supplies power to mirror and door.

46315


15. Remove top rubber grommet

  • By using a long nose pliers or nylon prying tool while pushing the wiring harness you just unplugged from the inside to the outside.
  • Once the rubber grommet is taken out, position it vertically (reposition rubber gourmet so it is not twisted) in between the door frame and vehicle body as seen in Fig 2 in picture below.
– This will make the wire go through easily and easier.
  • Guide a hanger wire through and turn signal wiring through it and insert it through the opening where the rubber gourmet came from.
  • Reinstall rubber grommet starting from the top one – start to insert the front to rear of the top rubber grommet.
  • Do the bottom next – easy one.
  • Do the same thing on driver’s side and reinstall speaker and door panel.

46316


16. Wiring connections

- Wire from LED turn signal lamp
: Black is ground
: Blue is parking light – white LED
: Red is turn signal – yellow LED

  • NOTE: You can opt to use parking light or not by not using/connecting blue wire.
  • I opted to use it with a switch so I can turn if off and on if I need to.
  • I have this LED switch as seen in Fig 14 in picture below from MIT in my other vehicles and liked it so much.

46317


- Fits in the blank slots perfectly like a glove and lights up(DRL) when parking light is on/LED parking light off at night in matching green color and on indicator (see two pictures below).
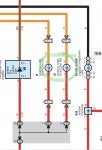
46318

46319


17. Tapping wires

- See picture for wire color code for parking light below.

46320


- See picture for turn signal wires below.

46321
 
18. Where to find the harness

- Remove 2 bolts to remove driver side panel as shown in picture below.

46322


  • Start from bottom left to right.
  • You need to cut blue tape that holds power door switch wire to lower the panel down.
  • Once taken out you will see this in the picture below.
  • Be careful removing this.
46323


  • You need to insert a flat screw driver just below the top of the lever arm and push it down before you pull lever arm to release it.
  • Once you have taken it off, push the harness downward to have more room to work with it as seen in picture below.
46324


19. Route passenger wiring

  • Using a hanger wire as shown in picture below.
  • Would help if you lit up the driver’s side with light so you can have an idea where the hanger will go through when peeping through the hole from the passenger side.
46325


- This is after the wire has passed through and tied up.

46326


20. Hook the hanger wire you just inserted from the passenger side with another wire

- As shown in the picture below.

46327


- After wire was fished out is shown in the picture below.

46328


  • The wire can go straight to the ECU but it goes under a cable.
  • I suspect that the cable was from the shifter and passing it through here may be dangerous because shifting may malfunction.
  • I opted to just go below it and before it.
  • I would suggest having a red tape or any visible color at the tip of the hanger wire to improve visibility of the hanger tip since you have little room to have good visual.
  • Need a lot of light under the dash to do this.
  • I use black tape and made it difficult to find it.

21. Let wire loom pass on top of ignition harness

  • With some slack to have room for steering column adjustment up and down.
  • Tie it with wire tie to secure it as seen in the picture below.

46329
 
22. Connect respective wires to harness

- As seen in pictures below.

46330

46331


- Ground connected shown in picture below.

46332


  • Reinstall all necessary parts back and you are done.
  • My connections are soldered.
  • Harness after final connections were made shown in picture below.
46333


Again, huge thanks to LetsGoPlaces for this nice writeup! Hopefully this will help increase its utilization!
 
@h4ldol good work on redoing the posts. You should do that with some of my stuff on here too. I used to have the attention span (pre-children) for all this but these days, I just record it for YouTube, much easier.
Thanks, I'll check out your write-ups. Are they on this board or mostly on YouTube?

@h4ldol, you really made my post much much better. Thank you for taking the time and organizing it in such a way it is easily understood. I hope you were able to fix your problem.
Sure! It's a great tutorial for sure and deserves to be seen and used more than the previous formatting probably allowed. Also, I plan to use it again myself for my OEM lights and wanted to make it easier for myself hehe.
 
61 - 80 of 85 Posts